Quantcast
Channel: enterprise voice – Real-Time UC
Viewing all 14 articles
Browse latest View live

Call Via Phone app Advanced review

$
0
0

With SNOM’s Enhanced Better Together being demonstrated at WPC 2013: http://www.snom.com/en/news/archive/article/2013/en/snom-to-demonstrate-pc-pairing-%E2%80%9Cbetter-together%E2%80%9D-features-on-its-microsoft-lync-qualified-desktop-phones-at-wpc-2013/ and availability being most likely end of 2013. I figured it would be a good time to post my review of the Call Via Phone Advanced. A 3rd party Better Together type application for Lync and SNOM phones which is currently available.

The Call Via Phone application comes in two editions (free and paid) and works with Lync 2010 and 2013.

After installing the Call Via Phone application from the MSI, the Lync client will now have a new item in the Tools drop down.
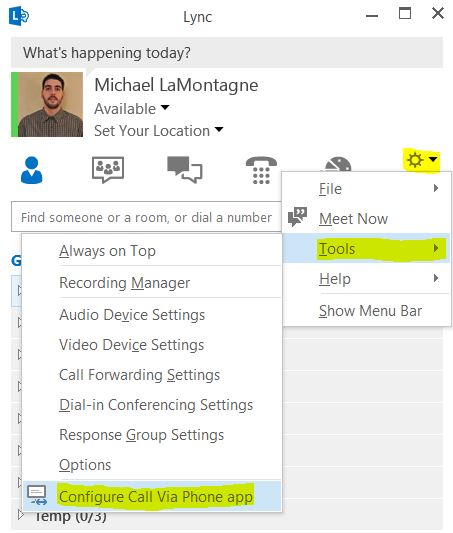
configure_call_via_phone

To configure the application enter the SNOM phone IP address, the Username/Ext, Password/Pin and Save. Note: Username/Password should be the account that can administer the SNOM phone’s web interface.
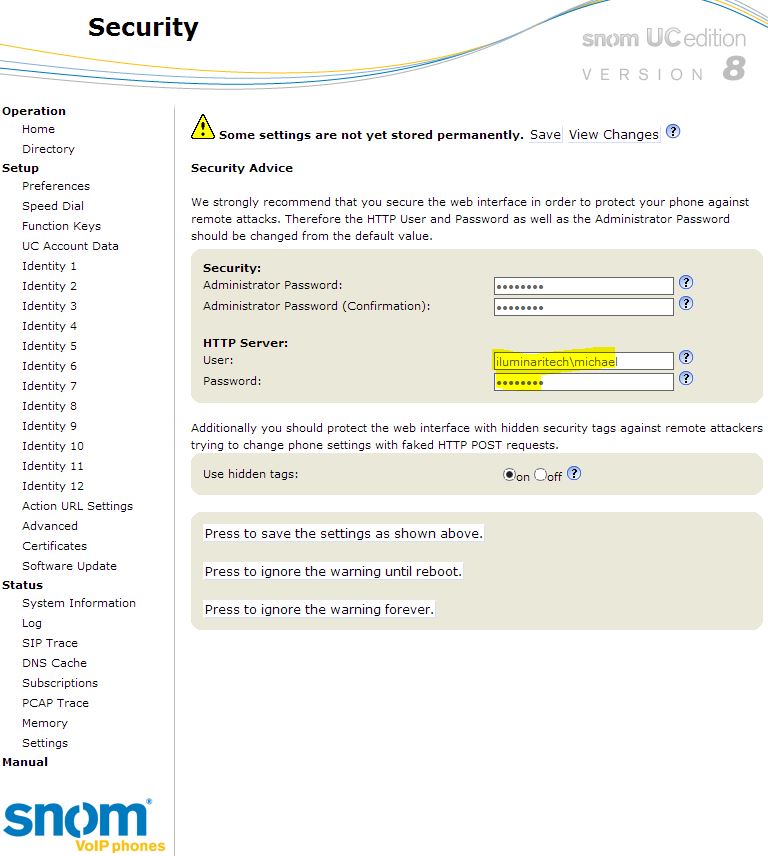
snom_device_settings

configure_call_via_phone_config

The freeware version is pretty straight forward which gives the ability to right click a contact and click “Call Via Phone”, this will establish the call on your SNOM phone.
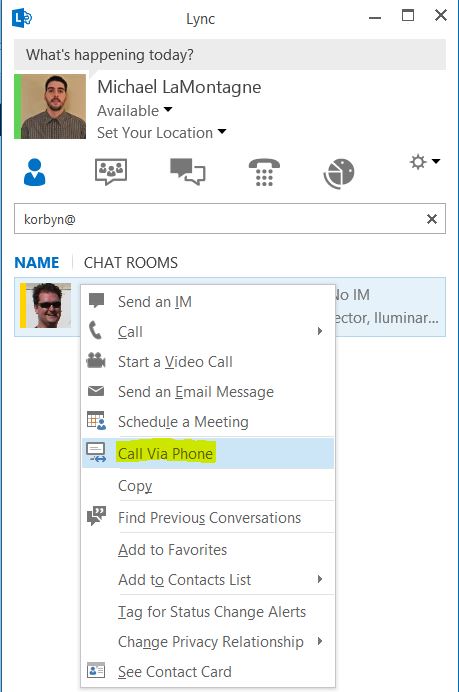
contact_call_via_phone

The Advanced version will show an options menu after clicking “Call Via Phone”.
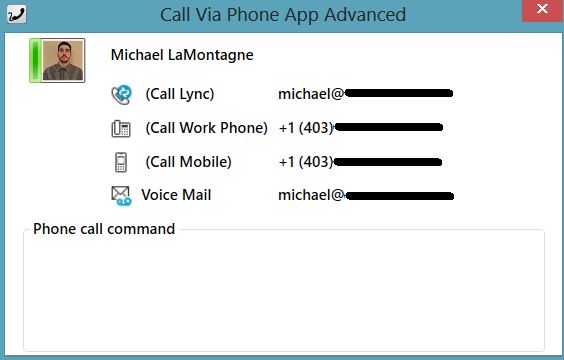
numbers_call_via_phone

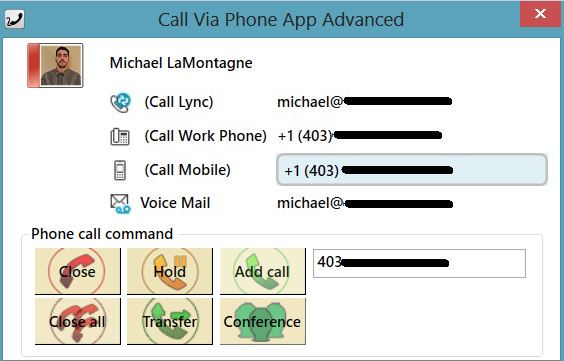
After clicking the number to contact, the call is answered on the SNOM phone and a popup menu with Phone Call commands for the active call will be displayed.
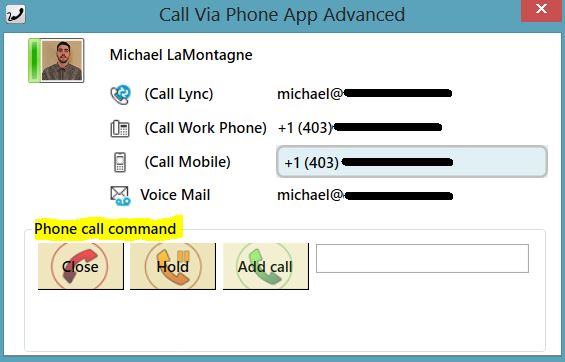
call_option_call_via_phone

You can type in a number and click “Add Call”, this will establish a call to the added number and display additional commands like Transfer and Conference.
call_option2_call_via_phone

Originally the Call Via Phone application was just for outgoing calls. I reached out to Gianluca the author of the application and made some suggestions. A few emails later I had an updated version 1.5.6, that could handle incoming calls! Note: Account on the SNOM phone should be the same account signed into Lync to allow for incoming functionality.

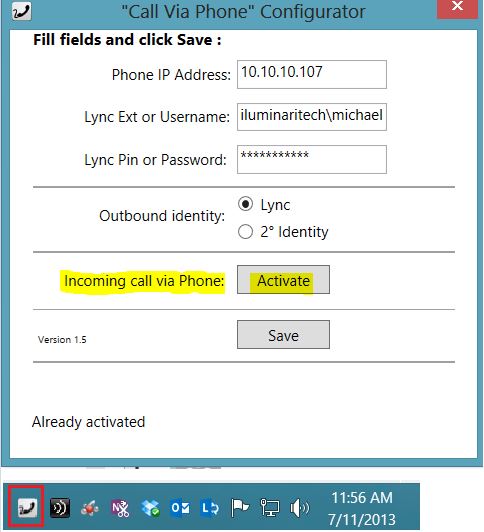
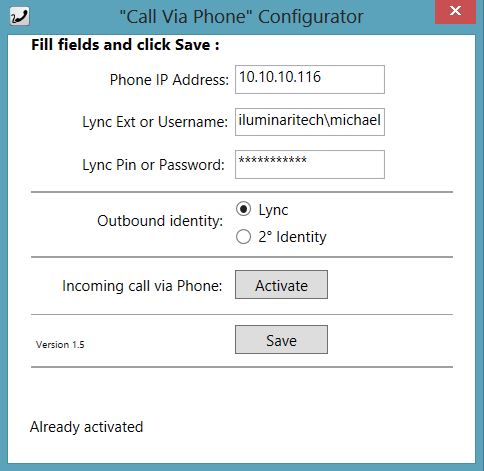
In the “Call Via Phone” Configurator there is an option to “Activate” the Incoming Call via Phone service.
incoming_option_call_via_phone

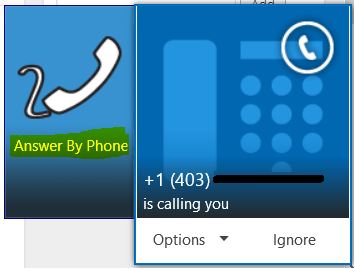
This creates a system tray icon that catches incoming call events and appears next to the Lync toast.
incoming_call_via_phone

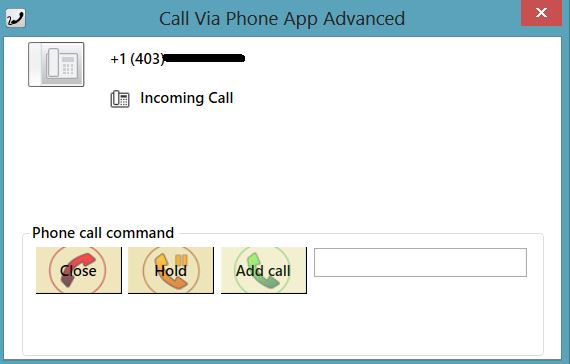
After clicking “Answer By Phone”, the call is answered on the SNOM phone and a popup option menu with available Phone Call commands for the active call will be displayed.
call_in_option_call_via_phone

Benefits of Call Via Phone vs Enhanced Better together:

  • Can be made to work with other IP Phone vendors (Cisco, Polycom, Grandstream, 3CX, Yealink)
  • Doesn’t not require Lync user to have Enterprise voice for Outgoing call functionality
  • No windows driver protocol limitations, allows for future customization (Programming Phone keys, full interaction with any functionality available on the Phone)

For more info reach out to sales@callviaphoneapp.com

Phantom Conference Bridge

$
0
0

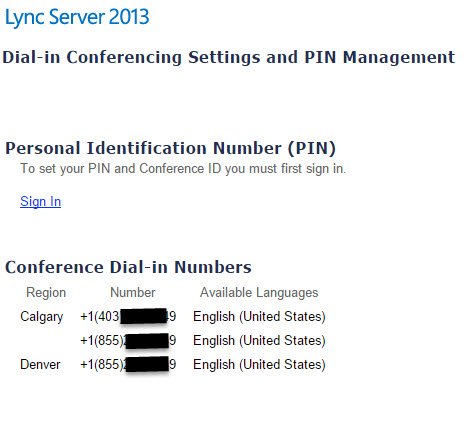
While verifying a new conference bridge for a client, I came across a phantom conference bridge entry listed on the Lync Server Dial-in page but not on the Outlook meeting invites.

pcb1

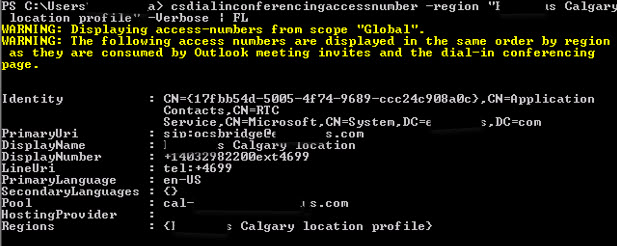
Using Get-CsDialInConferencingAccessnumber cmdlet which lists information about all dial-in conferencing numbers configured in an organization and the region parameter to search for the specific entry. A warning was returned saying the contact object for the entry could not be found. Looks like the bridge was leftover from the OCS days. Record the “Line URI” listed in the warning message.

get-csdialinconferencingaccessnumber -region "<RegionName>" -Verbose |FL

pcb2

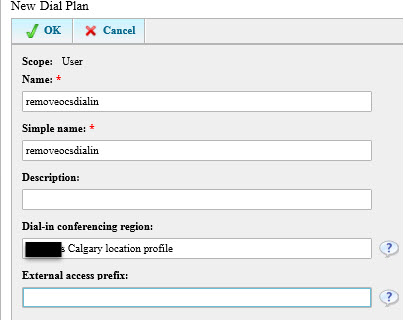
First step was to recreate the region that was associated to the phantom bridge. This was done by creating a new User Dial Plan with the “Dial-in conferencing region” exactly matching what was listed on the Dial-in page for the phantom bridge.

pcb3

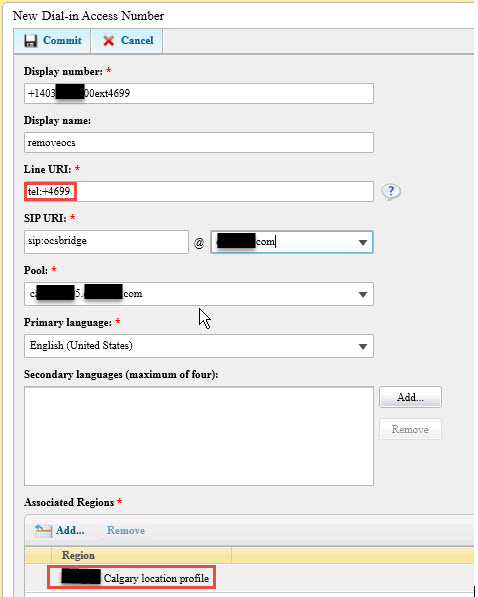
Next create a new Dial-in Access Number where the “Line URI” matched what was returned in the warning from the get-csdialinconferencingaccessnumber, and add the “Associated Region” that was created in the last step.

pcb4

Running the same get-csdialinconferencingaccessnumber as before will now display the contact object.

pcb5

Now delete the new Dial-In Access Number and the User Dial Plan that was created for the phantom bridge and invoke CMS replication (invoke-csmanagementstorereplication). Running the get-csdialinconferencingaccessnumber command will now show no object and the phantom bridge will be removed from the Dial-in page.

pcb6

pcb7

As a side note you may have noticed in the screenshots I’m using csdialinconferencingaccessnumber vs. get-csdialinconferencingaccessnumber, not sure if the cmdlet was just too long to type or it was late. After taking to Twitter about this “Feature”, Ravikanth Chaganti recommended I trace what’s actually happening.

trace-command -ex { csdialinconferencingaccessnumber } CommandDiscovery -PSHost -Verbose

One of the last steps when PowerShell is unable to find a command is to prepend the command with “get-“.

pcbn

Update: Looks like Andrew Morpeth blogged about a similar stuck conferencing number, see his post: https://ucgeek.co/2015/03/remove-stuck-conferencing-number-lync/

Lync conference bridge is in another call

$
0
0

While testing a new conference bridge that was added to an existing Lync Server 2013 deployment, the Lync client would report the bridge number “is in another call”.

ciac01

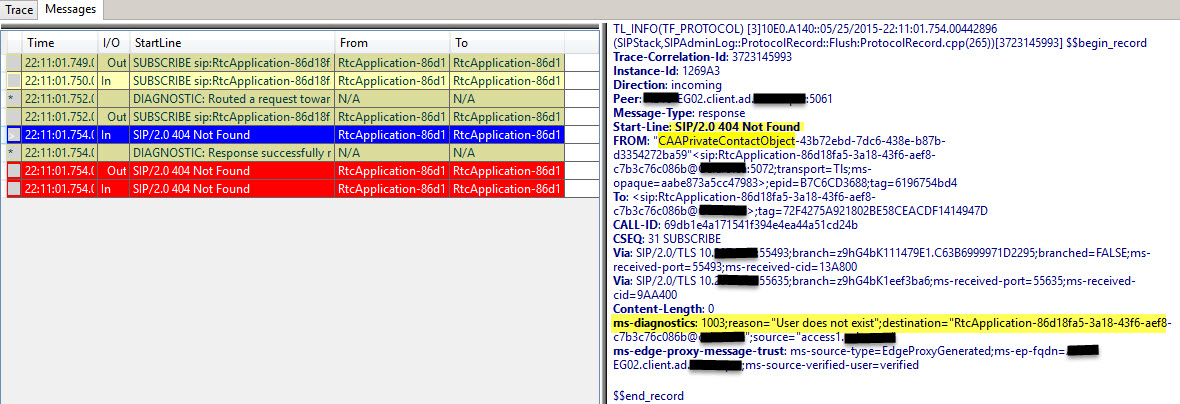
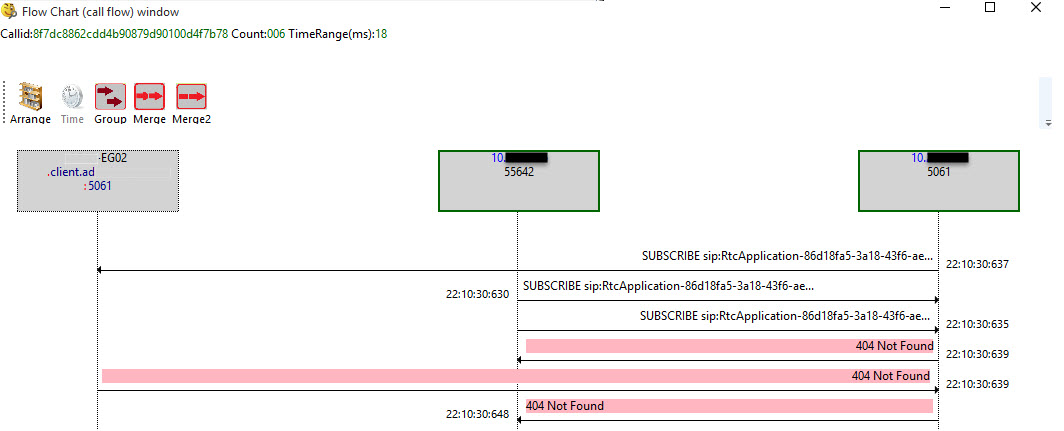
Sifting through server side logs the call was bouncing around like a hot potato between the Front End and Edge servers. The Front End would try to look up the object and return a “SIP 404 Not Found” (ms-diagnostics: 1003;reason=”User does not exist”;destination=”RtcApplication-86d18fa5-3a18-43f6-aef8-c7b3c76c086b@domain.com) and pass the request on to the Edge. The Edge would pass back the same SIP 404 error.

ciac03

ciac02

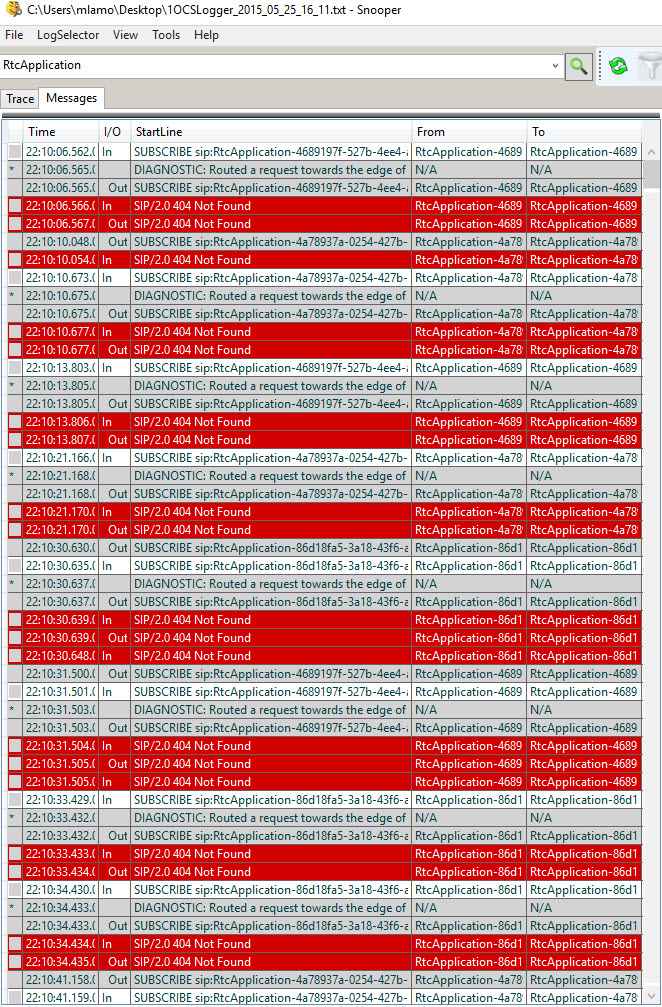
On to some trouble shooting steps… Removing and recreating the bridge, restarting the Conferencing Attendant and Conferencing Announcing Services and finally a Front End pool restart. No luck, back to the server logs. This time instead of searching a specific call, I broadened the filter to “RtcApplication”. Finding that all Application Contacts (RGS Presence Watcher, Call Park Service, CAAPrivateContactObject, Conferencing Announcement Service …) in the environment were giving 404 Not Found/User does not exist errors.

ciac04

Digging into Active Directory(AD) (I like to use Active Directory Explorer from Sysinternals: https://technet.microsoft.com/en-us/sysinternals/bb963907), I could see that all the corresponding Application Contacts exist from the server log. The msRTCSIP-ApplicationContacts container class was originally added in Office Communications Server 2007 R2 and a good TechNet article about the contact objects can be found at https://technet.microsoft.com/en-us/library/dd572377(v=office.13).aspx. Haven’t found an updated version for Lync or Skype for Business.

ciac05

Now is probably a good time to inform you that in this environment the Lync Servers were installed into a Child domain with the User objects and the Root domain was empty. I wouldn’t say it was a Null root as the Application Contacts were in the root domain. So after spinning cycles verifying Schema, Forest and domain(s) prep, permissions and passing AD queries between the domains every thing seemed correct with no errors.

Next to check out the User Replicator, as this periodically retrieves current user account info from Active Directory and synchronizes the information with the Lync Server’s user data database.

Get-CsUserReplicatorConfiguration

ciac06

At some point the client scoped Lync to be restricted to the Child domain, not realizing that the Application Contacts were outside this scope. This wasn’t a problem in an Instant Message and Presence world, but sure was after adding conferencing and enterprise voice! Luckily three commands and the conference bridge was functional.

Set-CsUserReplicatorConfiguration -Identity global -ADDomainNamingContextList $Null
Update-csuserdatabase
Update-csaddressbook

ciac07

Polycom VVX firmware 5.3+ will bypass Dial Plan normalization for 911 in Skype for Business and calls could fail

$
0
0

Hopefully the title of this blog has scared you into reading more and also testing in your own environment!

Today I was pulled into a support case where a client was testing 911 while switching sip providers, they discovered that the Skype for Business client was successful but the Polycom VVX would fail to make the all important call. Some more testing we found the VVX had no issues with other X11 calls like 411.

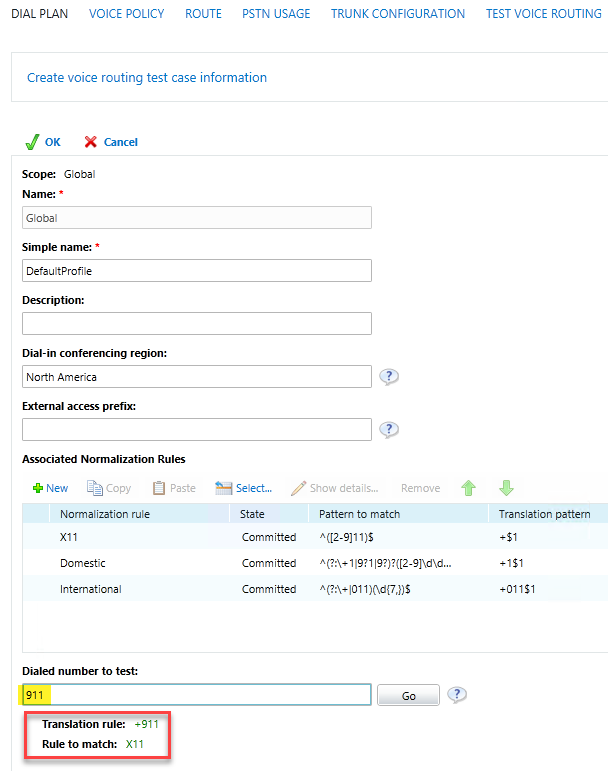
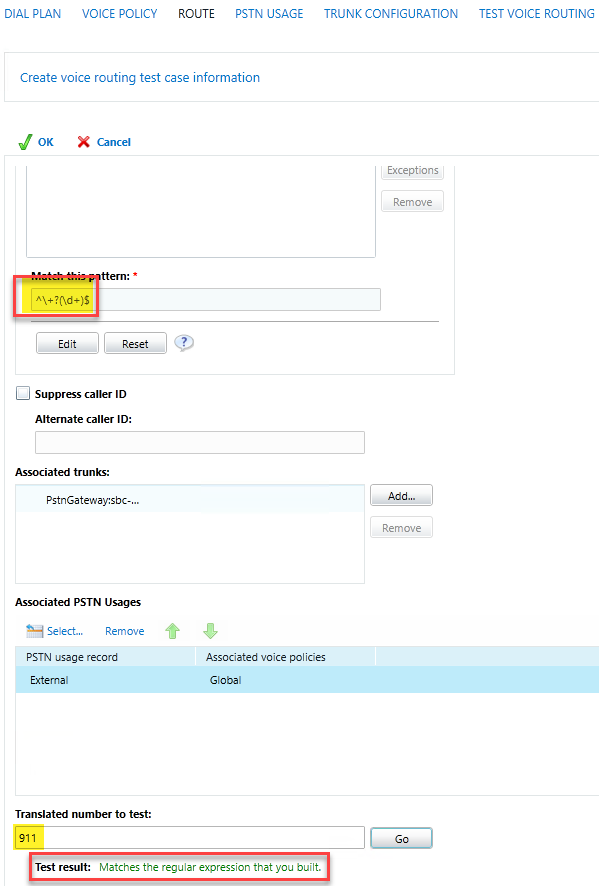
A quick check on the Dial Plan, “911” does have a translation rule to “+911″.
911-1

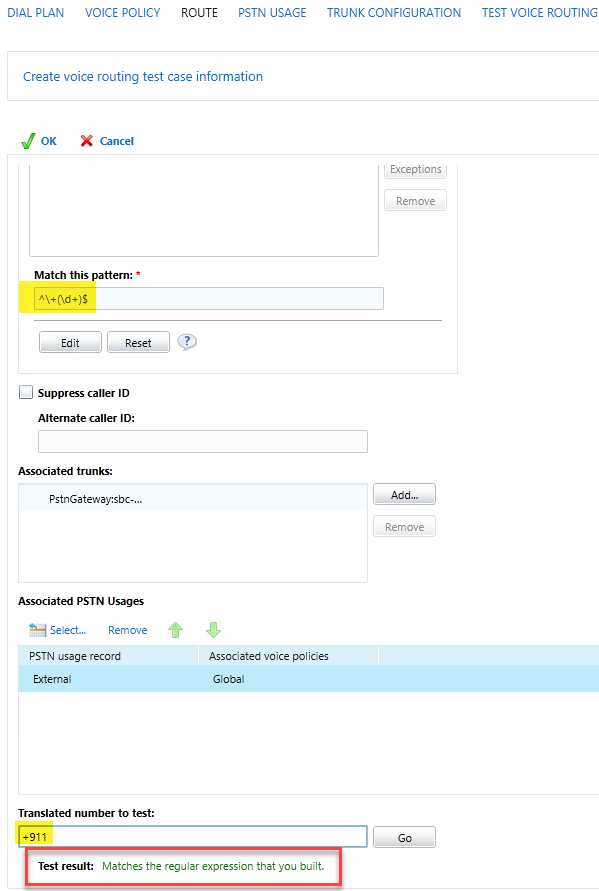
The Route pattern of ^\+(\d+)$ will allow “+911″ and pass it along to the PSTN.
911-2

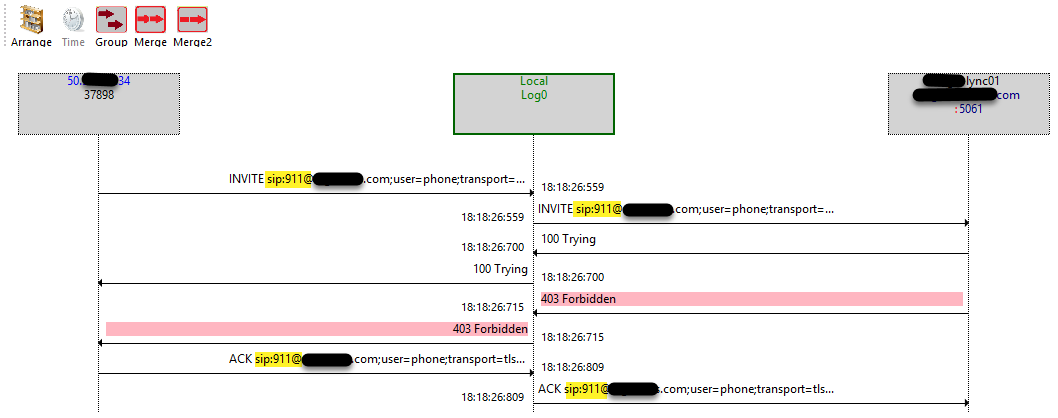
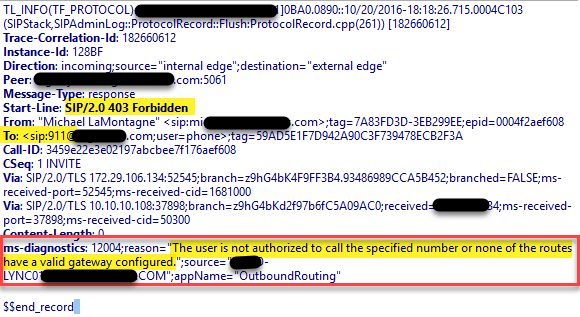
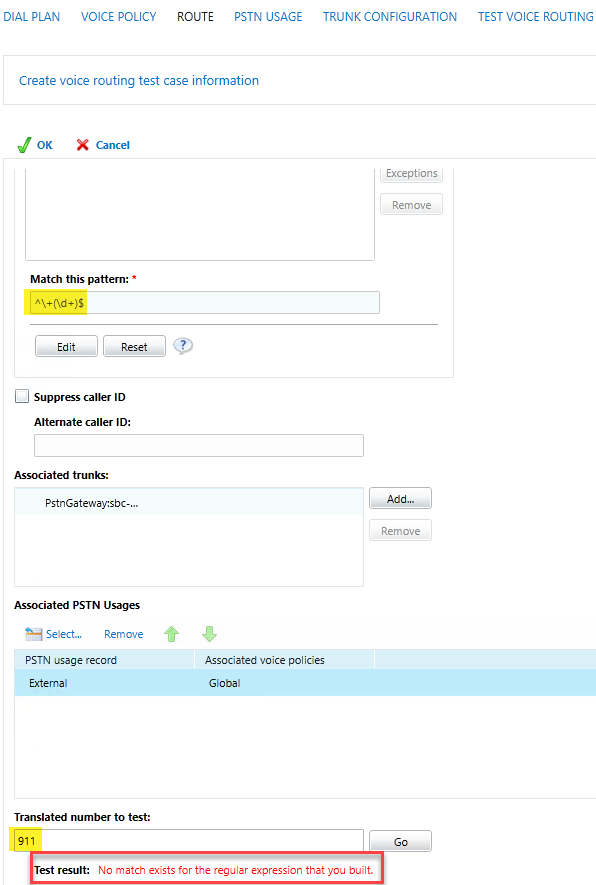
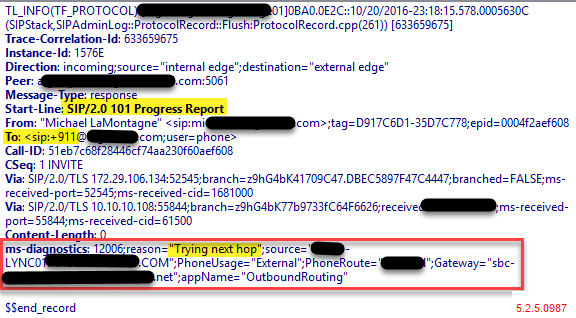
Time to trace… Look at that, the call from the VVX is sending “911” right to the Route and bypassing the Dial Plan normalization and getting rejected. “This user is not authorized to call the specified number or none of the routes have a valid gateway configured.”
911-6
911-7
911-8

Easy fix, let’s just add a “?” to the Route pattern ^\+?(\d+)$ and 911 is successful again from the VVX.
911-9

Strange thing is I know 911 from the VVX worked before with this client. Nothing like spending a night testing firmware (http://support.polycom.com/PolycomService/support/us/support/voice/polycom_uc/polycom_uc_software_for_lync.html)…

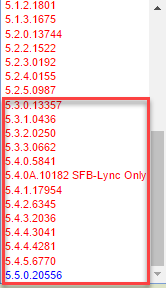
Found it! Looks like 5.2.5.0987 posted May 19, 2016 is the last firmware that the VVX translates “911” based on the dial plan to “+911″.
911-3

911-4

5.3.0.13357 also posted May 19, 2016 was the first firmware to introduce the ignoring Dial Plan normalization for 911 and has continued with all versions since (including the current beta).
911-5

Looks like a few have reported the issue but didn’t understand the cause:

A fellow colleague of mine, Korbyn has posted a similar article on 911: https://uccramblings.wordpress.com/2016/07/15/lync-skype-emergency-calling/

Skype Meeting: Join by phone links now include Conference ID DTMF

$
0
0

Who would have thought a simple mouse hover on a Skype Meeting invite would consume so many hours…

So what did I see?
confiddtmf-1

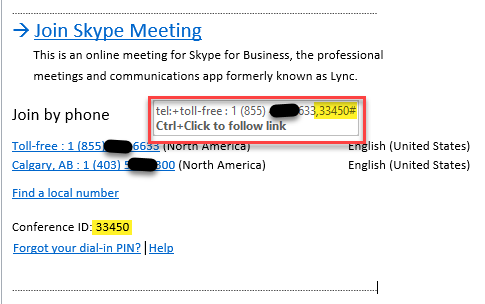
If you look closely at the Join by phone conference number links in the Skype Meeting, you will now notice that ,ConferenceID# has been added to the end of the phone number URLs.

What’s even better? If you click the link and click call (even though you can’t see these additional DTMF), the Skype for Business client will not only call the dial-in access number but also input the conference ID. This will join you right into the specific meeting.
confiddtmf-2

To break down the DTMF, we have a “,” which is a Soft Pause to wait for the Conferencing Attendant to pickup, next we have the conference ID followed by a “#”. Although if using the client why wouldn’t you just join as a Skype Meeting vs. PSTN only?

This would be great when joining from Smart Phones, but for most deployments I see it’s more important to add a city/location label to each Dial-in access number. This adds additional digits to these call URLs and the click to call won’t complete. See the “Ari” method on Ken Lasko’s Getting Creative with Lync Dial-in Conferencing Phone Numbers article. An alternative would be to use Modality’s CustomInvite to add Dial-in access number labels outside of the “Display Number” hacks, allowing the call links to be successful.

I also noticed the “Find a local number” link in the meeting invite is appending /?id=ConferenceID to the end of the dialin url. I wonder if these client changes will be leveraged for the one touch VTC joins when Polycom’s Video Interoperability Service is released (https://youtu.be/S-h_ZpBaUjA)?
confiddtmf-4

After testing a few Skype for Business environments, I have confirmed this was a client side update and not server side. Next was to determine at what point this feature was added by running through a handful of Office365 ProPlus builds and dealing with the silly Office Deployment Tool (ODT) bug: https://blogs.technet.microsoft.com/odsupport/2016/07/12/installupdate-errors-using-the-latest-version-of-the-office-deployment-tool-16-0-7118-5775.

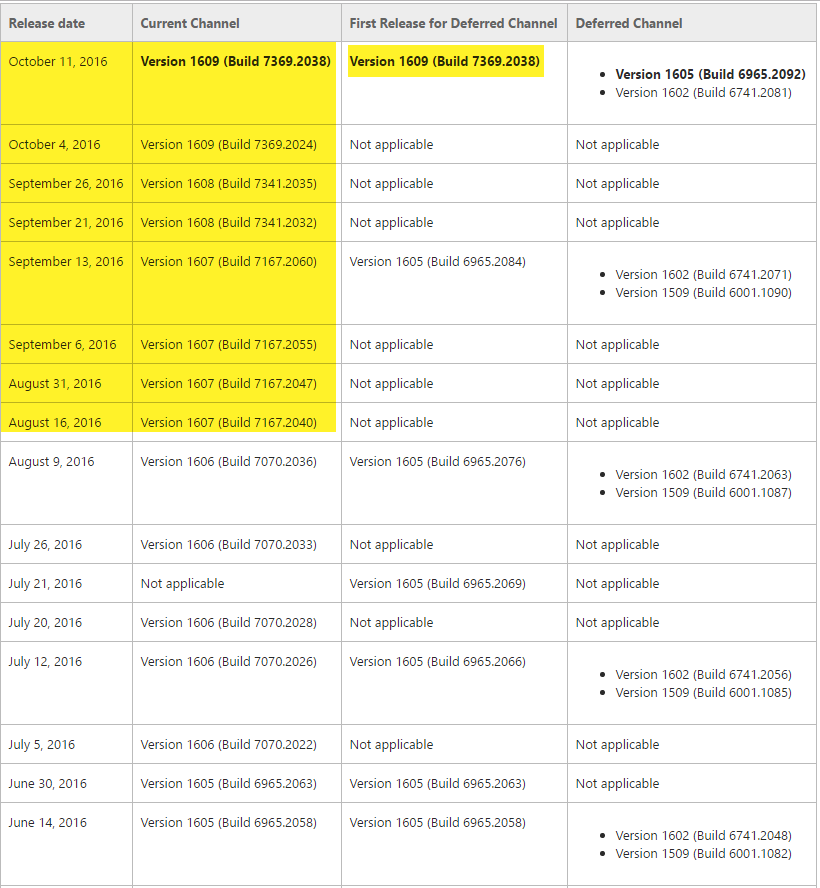
Conference ID DTMF was added to the Office 365 Current Channel in 16.0.7167.2040 (August 16,2016) and First Release for Deffered Channel 16.0.7369.2038 (October 11, 2016) and won’t be seen in the Deferred Channel until February 2017. https://technet.microsoft.com/en-us/library/mt592918.aspx
confiddtmf-3

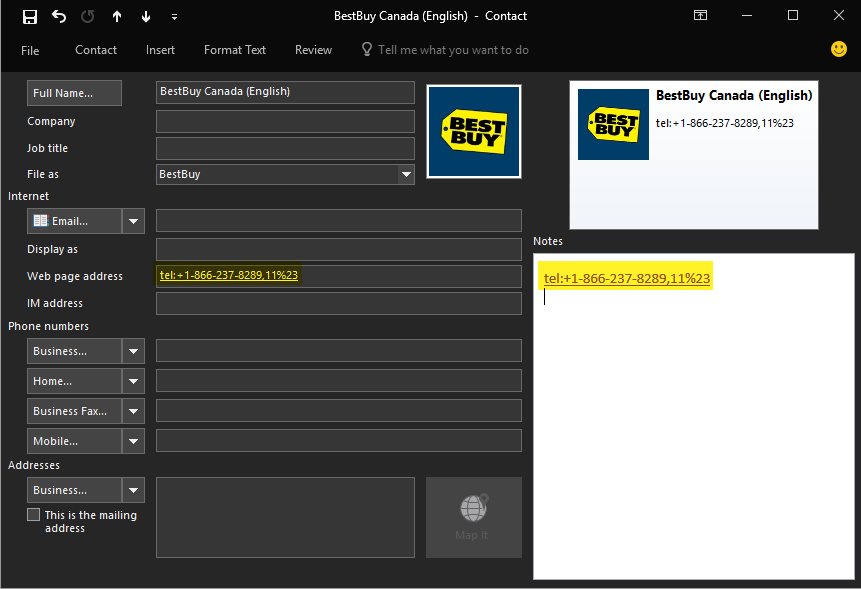
What’s interesting is DTMF support in contact numbers is ranked #4 on the ideascale Lync/Skype4B Improvement Suggestions site: http://lync.ideascale.com/a/dtd/ability-to-save-a-contact-s-number-along-with-pauses-and-DTMF/372928-16285. Unfortunately I was not able to get the client to accept DTMF unless the call was initiated from clicking a “Tel:” url. Having some fun I created an Outlook Contact item for BestBuy Canada. I was able to pass DTMF to select English by crafting a “Tel:” url and placing it either in the Notes or Web page address fields. I didn’t have much luck navigating through multi-level menus, so your mileage may vary.

confiddtmf-5

Get-CSUserSessionGUI

$
0
0

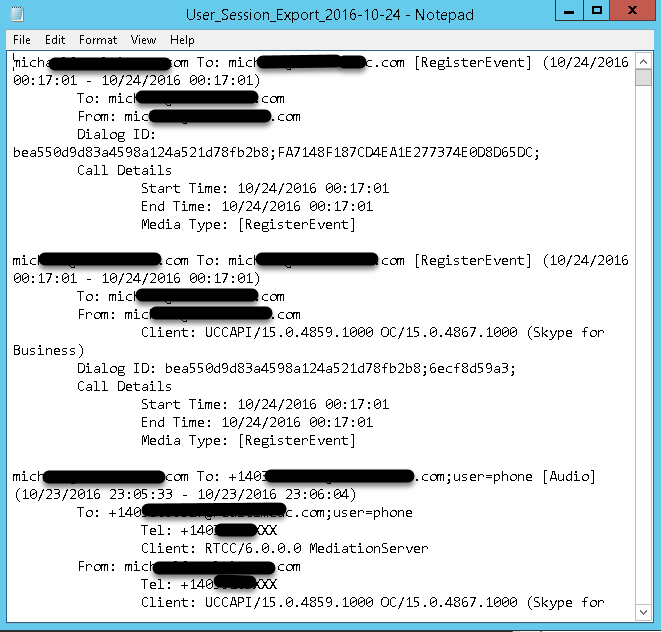
Earlier this month I blogged about the Session Details(Preview) in the Skype for Business Online admin portal, which can be found at: http://realtimeuc.com/2016/10/sfbo-session-details-preview/ a welcome addition to the portal! On the flip side I do prefer managing my tenants via PowerShell vs. hanging out in the browser. Here comes the Get-CSUserSession cmdlet. One thing to note is TechNet references a -StartDate parameter which actually should be -StartTime, I did submit this feedback back to Microsoft in July. The great thing about Get-CSUserSession is you also get access to Error Reports and Registration events that are not visible in the admin portal.

Figuring that it has been a while since my last PowerShell GUI script, Get-CSUserSession seemed right for the picking. Hence today’s release of Get-CSUserSessionGUI which can be found on the TechNet Gallery.
Script Download: Get-CSUserSessionGUI.ps1 https://gallery.technet.microsoft.com/Get-CSUserSessoinGUI-ac6992f2

Get-CSUserSessionGUI is a PowerShell GUI script that connects to your Skype for Business Online tenant to run Get-CSUserSession queries. This will allow you to retrieve user session information within a specified period. Ideal for troubleshooting Cloud PBX or other Skype for Business Online modalities.

Features:

  • Double clicking a line item will copy row into clipboard
  • Keyboard press of “+” will expand all child rows under current selection
  • Keyboard press of “-” will collapse the selected row and child items
  • “Export All” button will save all rows to specified text file

A prerequisite for the script is the Skype for Business Online Windows PowerShell Module: https://www.microsoft.com/en-us/download/details.aspx?id=39366

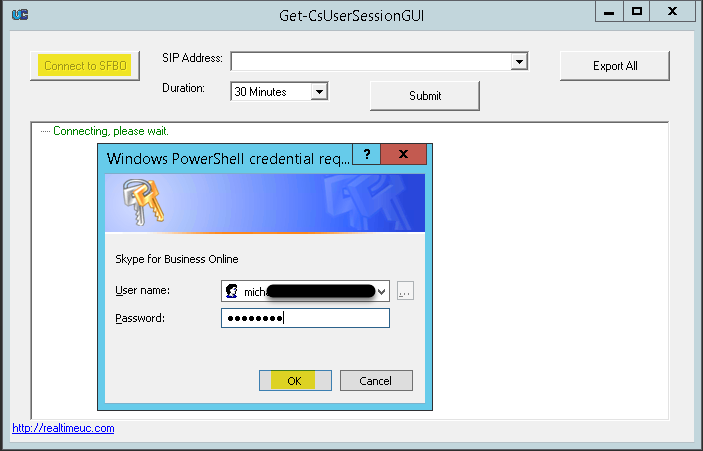
Once launching Get-CSUserSessionGUI, click “Connect to SFBO” and enter in your Skype for Business Online credentials.
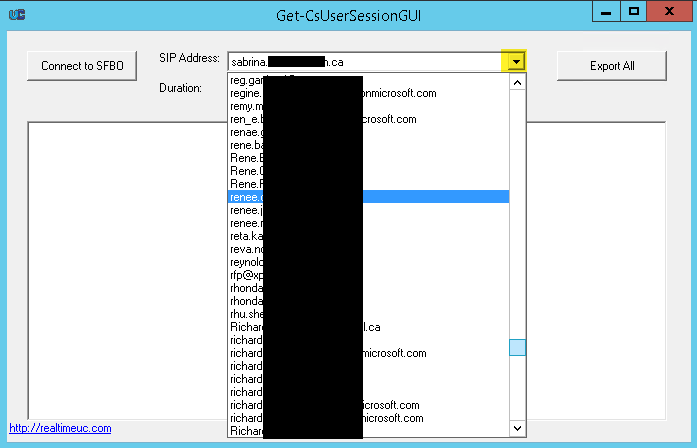
us-1

After the script connects, it will take a few moments to populate the “SIP Address” drop-down based on the number of users configured in the tenant. Took about 45 seconds for 4000 users in my testing. Now with the list populated, select the desired user. You can speed up the process by typing the first letter of the user’s address.
us-2a

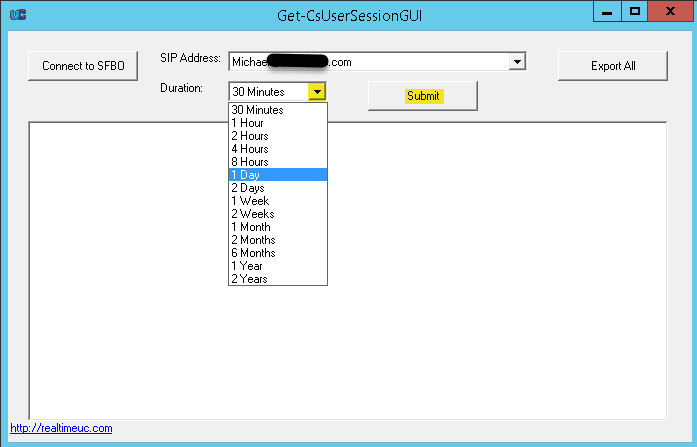
Selecting the “Duration” will determine how much time from the current time to search for User Session data.
us-2b

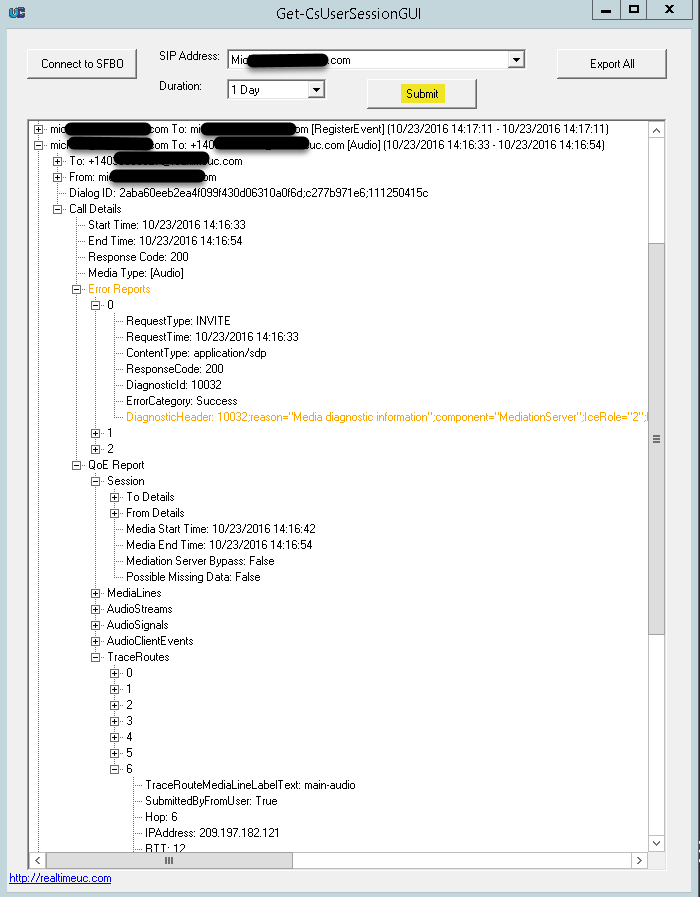
Clicking “Submit” will run the crafted search and populate a TreeView with the results. Clicking the “+” next to a line will expand a single item, alternatively pressing “+” on the keyboard will expand all sub items under the selected item. Clicking the “-” next to a line will collapse the selected item, alternatively pressing “-” on the keyboard will collapse all sub items under the selected item.
us-2

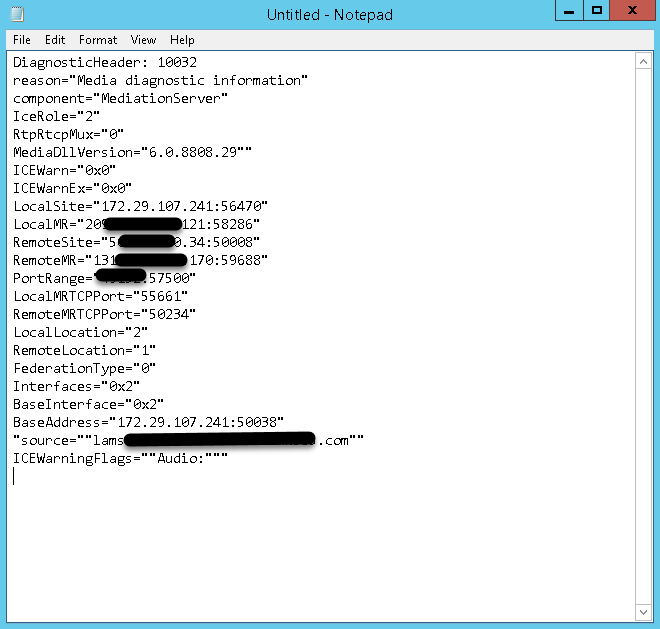
Double clicking an item will copy the highlighted item to the clipboard, there is extra logic for double clicking a “DiagnosticHeader..” line and the row will be formatted for better viewing into the clipboard.
us-4

The “Export All” button will prompt for a file to save all rows and sub items.
us-3

Script Download: Get-CSUserSessionGUI.ps1 https://gallery.technet.microsoft.com/Get-CSUserSessoinGUI-ac6992f2

Object reference not set to an instance of an object error while enabling CloudPBX

$
0
0

A couple weeks ago I came across a client issue enabling CloudPBX for Skype for Business Online users. The correct Set-CsUser command that would normally enable users, was bleeding red errors in PowerShell. The command is pretty straight forward and was successful the day before.
An example command:

set-csuser -identity usersipaddress@domain.com -EnterpriseVoiceEnabled $True -HostedVoiceMail $True -OnPremLineURI tel:+12345678901
Instead of enabling the specific user for CloudPBX, PowerShell returned an “Object reference not set to an instance of an object” error. Stripping down the cmdlet, it was determined that the error occurs when attempting to set the EnterpriseVoiceEnabled parameter on Set-CsUser to $True.

objerr
objerr1

After hitting up the MVP Community, I have found this is occurring globally and randomly within Office365.

Although I can’t explain what triggers the issue, I have come up with the following workaround that can help others that are experiencing the (hopefully temporary) issue that could be preventing CloudPBX deployments.

The fix is to set the HostedVoiceMail parameter on Set-CSUser to $True alone without any other parameters, after doing so wait ~10 seconds and run your original Set-CsUser command setting the Enterprise Voice parameters and all is successful. If HostedVoiceMail is already $True and seeing the issue with EnterpriseVoiceEnabled, toggle HostedVoiceMail to $False and back to $true and should be good to go.
objerr2

objerr3

Enable-CsOnlineUMMailbox results in 500 Internal Server Error

$
0
0

While onboarding a new customer with CloudPBX in Skype for Business Online, I came across an issue enabling the client APIs for use with Azure Voicemail. Normally, this is a simple one-liner in PowerShell:

Get-CsOnlineUser user@domain.com | Enable-CsOnlineUMMailbox

But today was a different story… The Enable-CsOnlineUMMailbox started to bleed “The remote server returned an error: (500) Internal Server Error”.

Next was to see if the UM Mailbox was created.

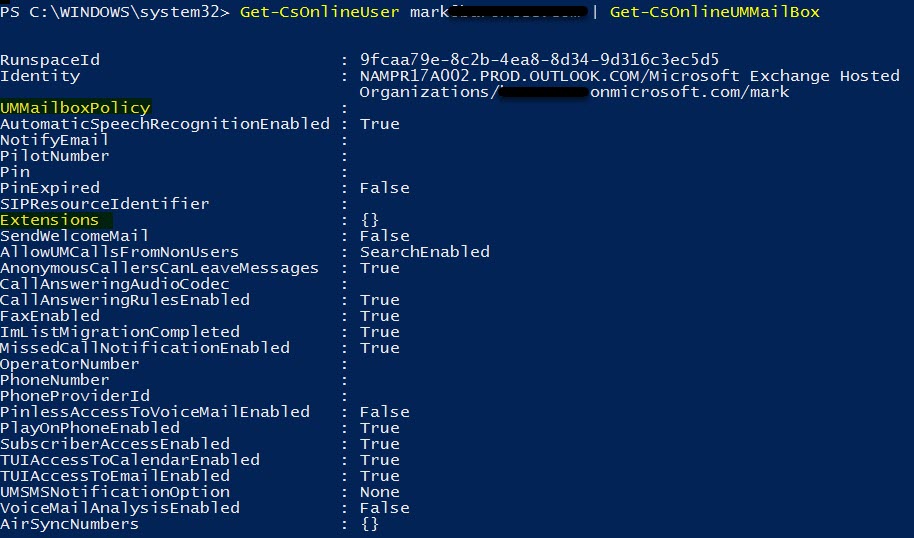
Get-CsOnlineUser user@domain.com | Get-CsOnlineUMMailBox

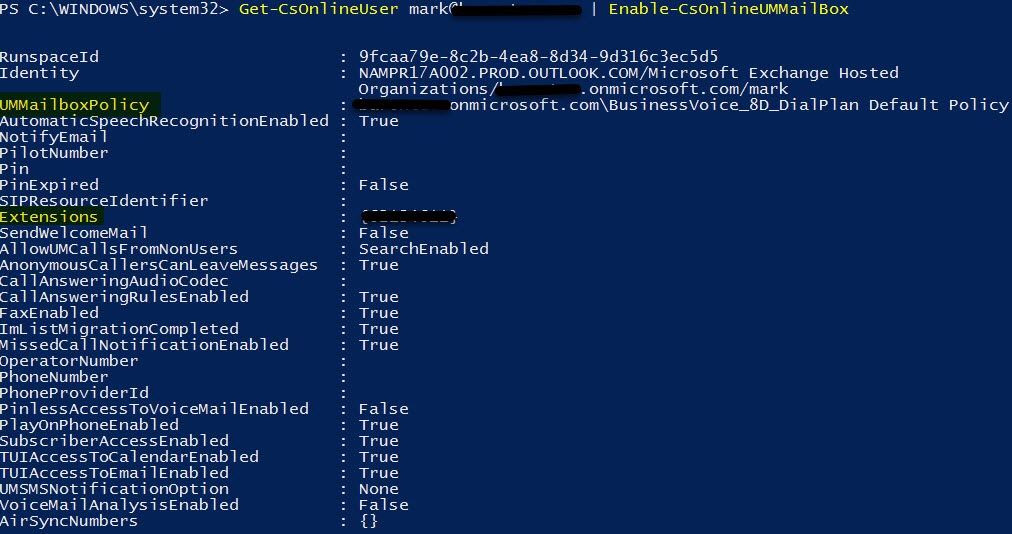
I found the UM Mailbox was partially created but was missing the UM Mailbox Policy, as well as the Extension.

So onto removing the UM Mailbox:

Get-CsOnlineUser user@domain.com | disable-CsOnlineUMMailbox

Same error, “The remote server returned an error: (500) Internal Server Error”.

Let’s try from Exchange Online:

Get-UMMailbox user@domain.com | Disable-UMMailbox

A new error, “The operation couldn’t be performed because ‘mark’ matches multiple entries.”

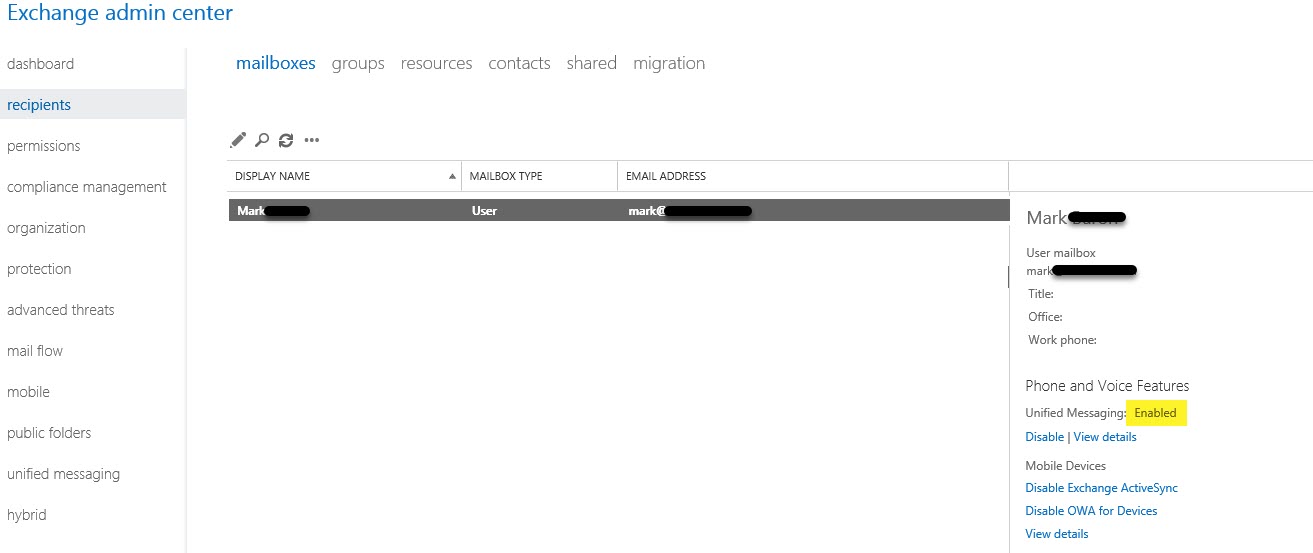
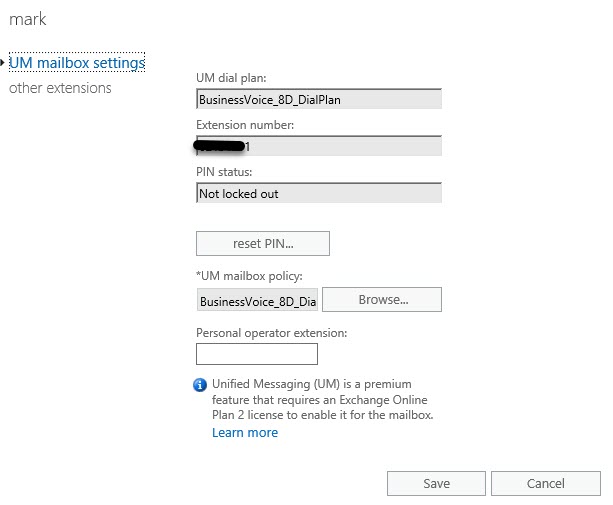
Checking via the Exchange Online admin center, I could see Unified Messaging was enabled.

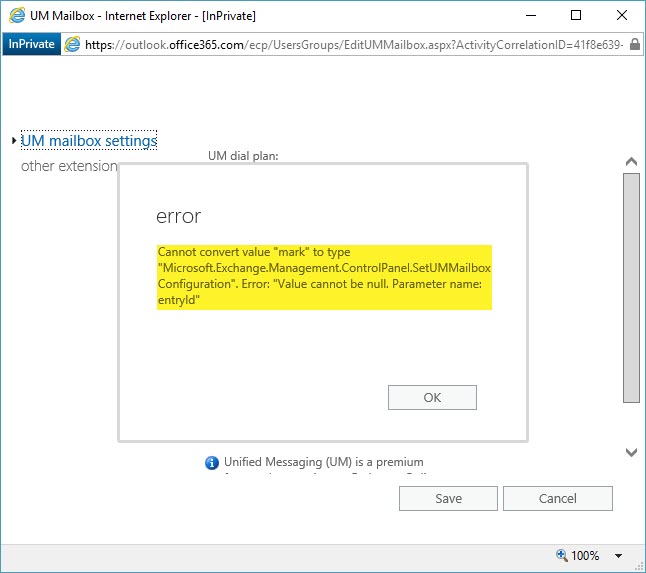
Attempting to “View details” for Unified Messaging on the account returned a lovely, “Cannot convert value “mark” to type…….”

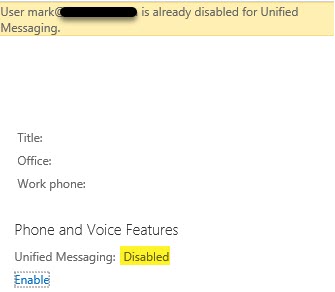
Disabling Unified Messaging from the Exchange Online admin center displayed “user is already disabled for Unified Messaging” and showed Unified Messaging as “Disabled”. Until clicking refresh in the browser, and it was back to “Enabled”.

Being how the error both in Exchange Online admin center and PowerShell referenced the user’s mailbox (“mark”) vs. the email address in the error, I decided to run a quick query:

Get-Mailbox mark* |ft name*, alias*

Bingo, the alias of “mark” was used on two different mailboxes. Don’t ask me how the customer pulled that off. I would have thought Exchange Online mailbox creation for cloud users would error on duplicate alias.

Using the Exchange Online admin center, I modified the Alias on one of the accounts.

In Exchange Online, I enabled the UM Mailbox again:

Get-Mailbox -identity user@domain.com | Enable-UMMailbox -UMMailboxPolicy 'BusinessVoice_8D_DialPlan Default Policy'

This worked, but I noticed the Extension was the user’s mobile number and not the LineURI set in Skype for Business Online.

Running the original Enable-CsOnlineUMMailbox command seemed to correct the Extensions.

To be safe, I disabled the UM Mailbox again via Skype for Business Online, confirmed it was also removed from Exchange Online and recreated in Skype for Business Online once again:

Get-CsOnlineUser user@domain.com | disable-CsOnlineUMMailBox
Get-CsOnlineUser user@domain.com | get-CsOnlineUMMailBox
get-mailbox -Identity user@domain.com | get-UMMailbox
Get-CsOnlineUser user@domain.com | enable-CsOnlineUMMailBox

The “View details” in Exchange Online admin center started working as well.


Dude where’s my CSOnlineUM cmdlets?

$
0
0

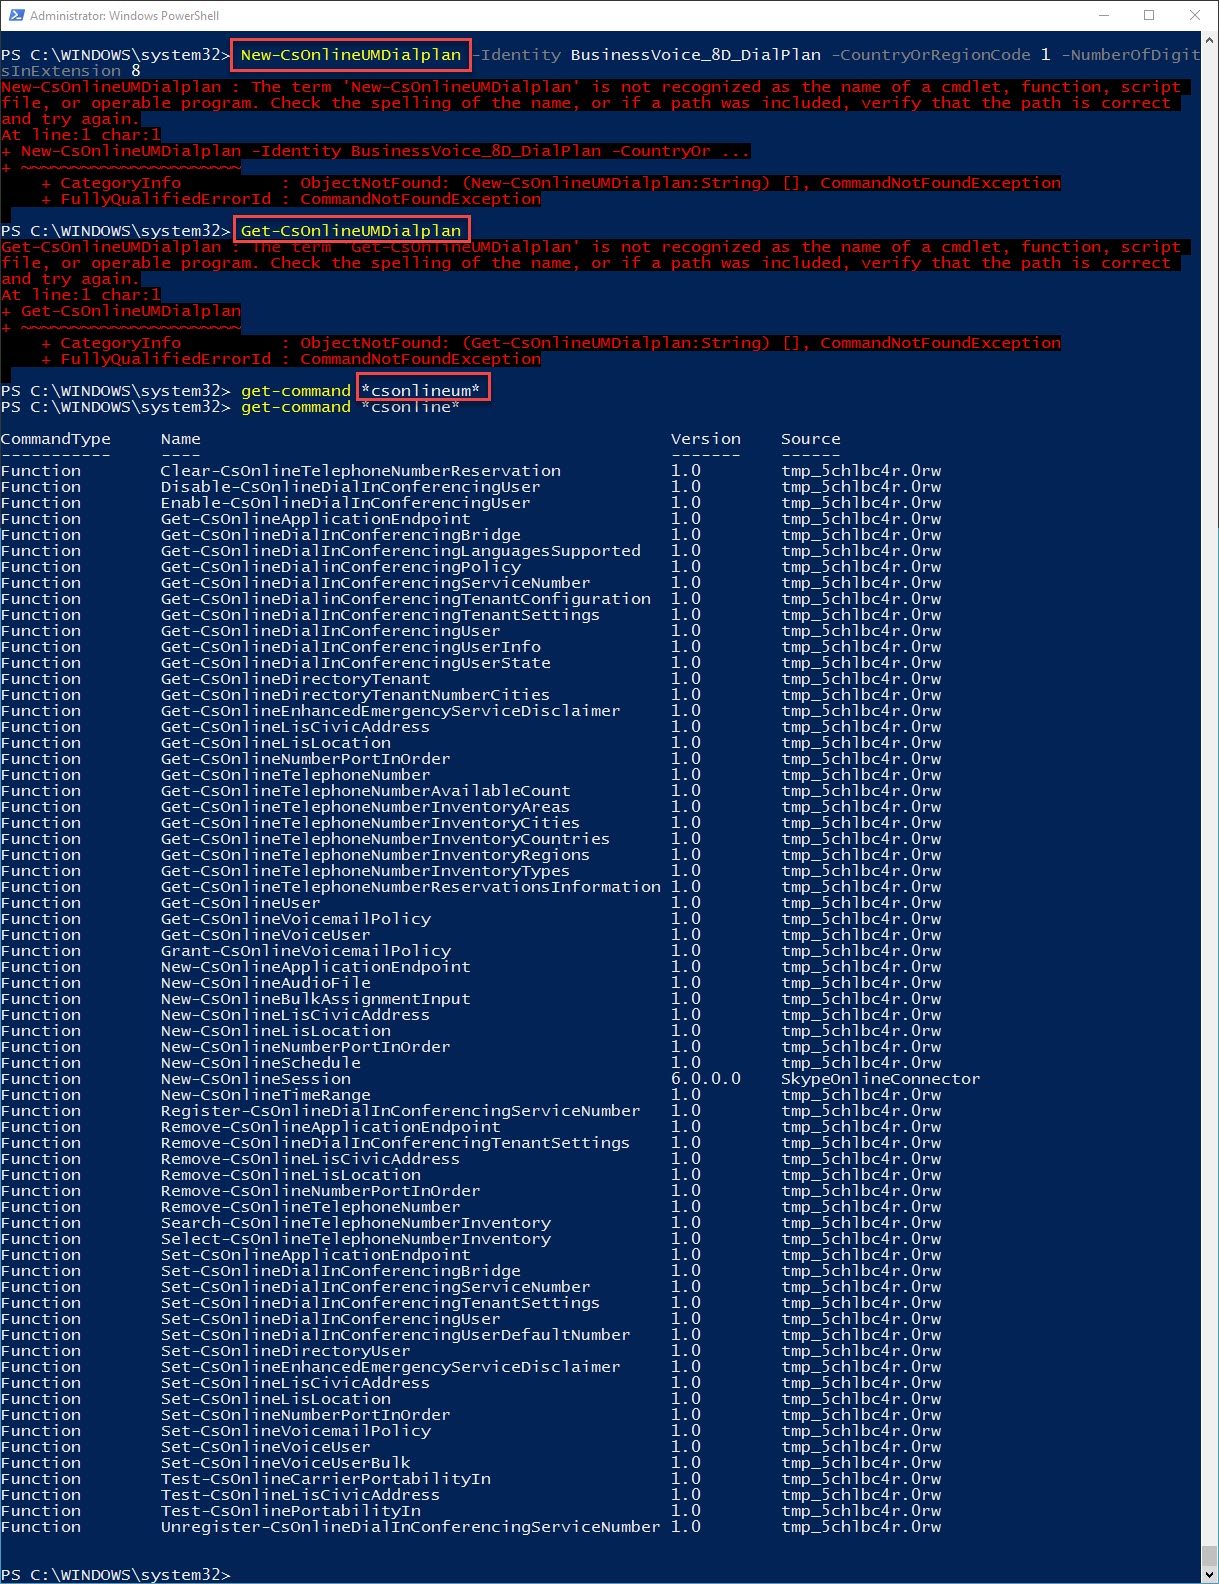
Today while enabling a new Customer for CloudPBX, I ran into an issue using the New-CsOnlineUMDialplan cmdlet. The Skype for Business Online PowerShell Module returned “The term ‘New-CsOnlineUMDialplan’ is not recognized as the name of a cmdlet, function, script file, or operable program…”. This cmdlet is used to turn on the enhanced features of voicemail by enabling the client APIs when using Azure Voicemail.

Which is referenced at:

Screenshot of error and search for any CSOnlineUM commands:

List of missing commands:

  • Get-CsOnlineUMDialplan
  • New-CsOnlineUMDialplan
  • Remove-CsOnlineUMDialplan
  • Set-CsOnlineUMDialplan
  • Disable-CsOnlineUMMailBox
  • Enable-CsOnlineUMMailBox
  • Get-CsOnlineUMMailBox
  • Set-CsOnlineUMMailBox
  • Get-CsOnlineUMMailBoxPolicy
  • New-CsOnlineUMMailBoxPolicy
  • Remove-CsOnlineUMMailBoxPolicy
  • Set-CsOnlineUMMailBoxPolicy

After reaching out to Microsoft, I was informed the cmdlets were removed to improve the Azure Voicemail service and the enhanced voicemail features are automatically enabled for end users after the first voicemail.

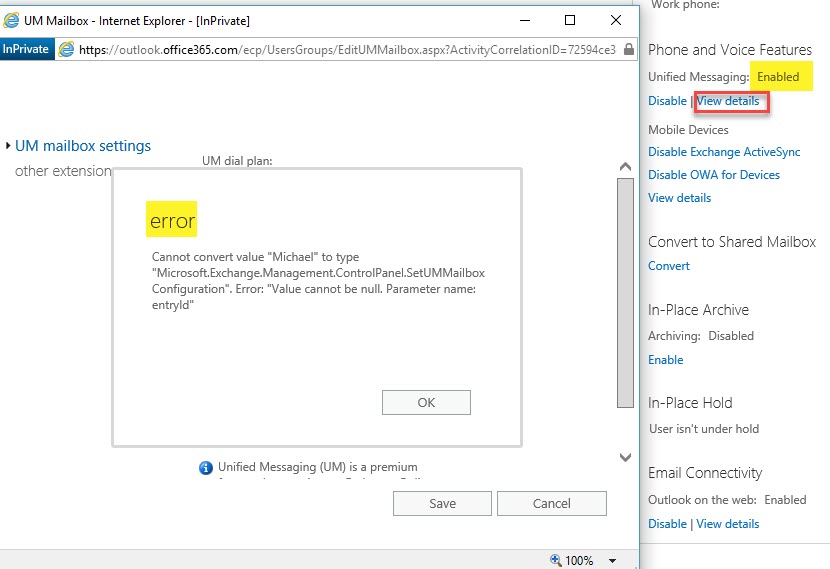
Testing with a new tenant, I can confirm that within the Exchange Online Admin Center after the first voicemail is deposited the Unified Messaging feature flips to “Enabled” for the individual user. But clicking “View Details” results in an error: “Cannot convert value “XXXXX” to type “Microsoft.Exchange.Management.ControlPanel.SetUMMailboxConfiguration”. Error: “Value cannot be null. Parameter name: entryId”“.

Using Get-UMMailbox to compare an account that used the New-CsOnlineUMDialplan vs. one with the new automatic enable, I can see that the new method doesn’t set the UMDialPlan, UMMailboxPolicy, Extensions, PhoneNumber, CallAnsweringRulesExtensions attributes or adds an entry to the EmailAddresses for EUM:.

I’ll update this post once the corresponding TechNet articles are released.

Auto forward Azure Voicemail messages

$
0
0

While building out a few Team-Call Groups for a customer using CloudPBX in Skype for Business Online, we ran into an issue handling voicemail messages using Inbox/Email Rules. The request was for all voicemail messages and missed call notifications to be forwarded to the members in the Team-Call Group.

Simple enough, fire up Outlook create an Inbox rule forwarding all messages to the agents. Well, that worked for emails but not voicemail.

What if the rule is modified to have a condition of “It’s of the type….” “voice mail”? No luck.

If we take a step back and think about what is going on. We know that CloudPBX does not use Exchange Unified Messaging for voicemail, but a new Azure Voicemail service. Information on Azure Voicemail can be found at:

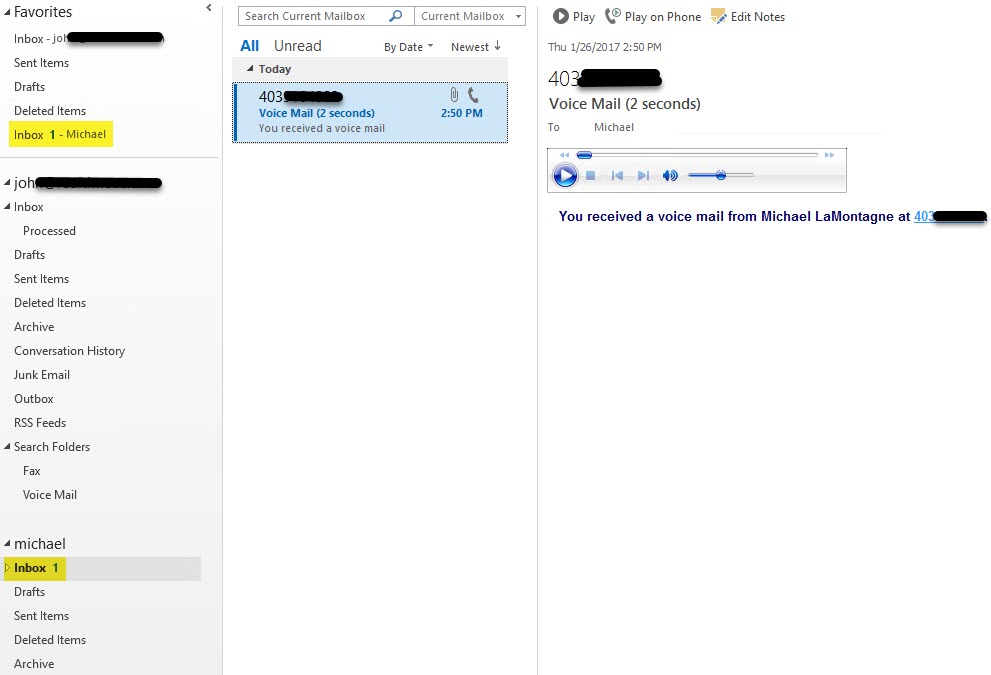
Azure Voicemail is using Autodiscover, OAuth and EWS to deposit messages directly into the user’s mailbox and would only use SMTP to resend a message to the mailbox in the case of a failure. Being how voicemails are placed instead of sent, the Inbox rules never trigger. I remember running into this long ago with Cisco Unity voicemail and Exchange.

Workaround 1: Leverage mailbox delegation. Agents could access the Team-Call group’s mailbox in both Outlook and OWA. Which could allow for easier voicemail processing. The first agent to access the message, would cause the message to be read and could move it to a processed folder once dealt with. Unfortunately this was not the workflow the customer wanted.

Workaround 2: My first thought was create a PowerShell script to query the mailbox using EWS and forward the messages along to the agents. Some Google-fu and found: https://seanonit.wordpress.com/2014/10/29/using-powershell-and-ews-to-monitor-a-mailbox/. That lasted about a minute before Azure popped in my mind.

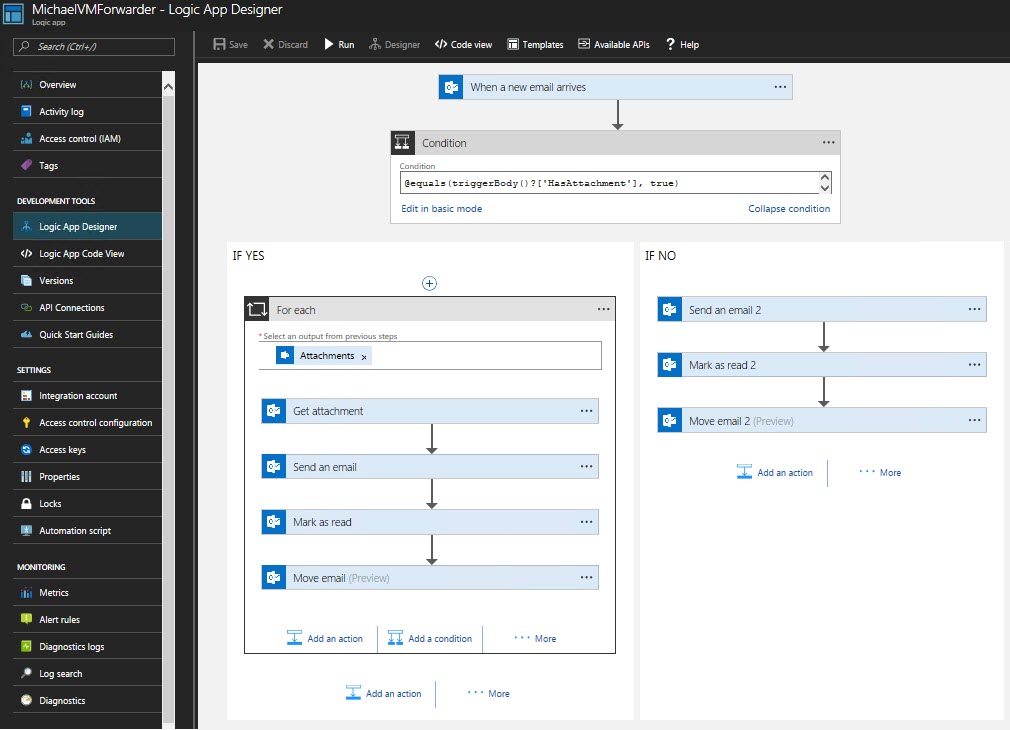
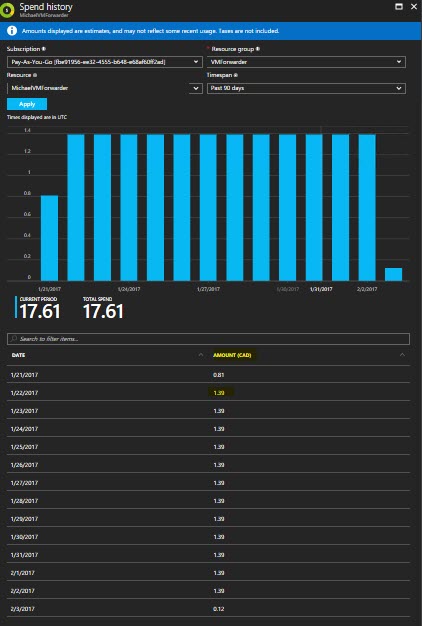
Workaround 3: Bring a gun to a knife fight (Azure Logic App). Armed with some Azure credits, I fired up the Logic App Designer and quickly figured out this was going to be a little more work than I had hoped. Not sure why, but there isn’t a simple template to read new emails and forward… Basically you need to check if the new email has an attachment or not and process it differently. Logic Apps are very unforgiving and you need to account for every scenario. I’m not ashamed to admit it, building such simple logic took me hours! What I wasn’t expecting was this little Logic App with an Office365 API Connection to cost a buck a day. I needed to create about 10 of these, so this wasn’t going to scale even with CSP pricing.

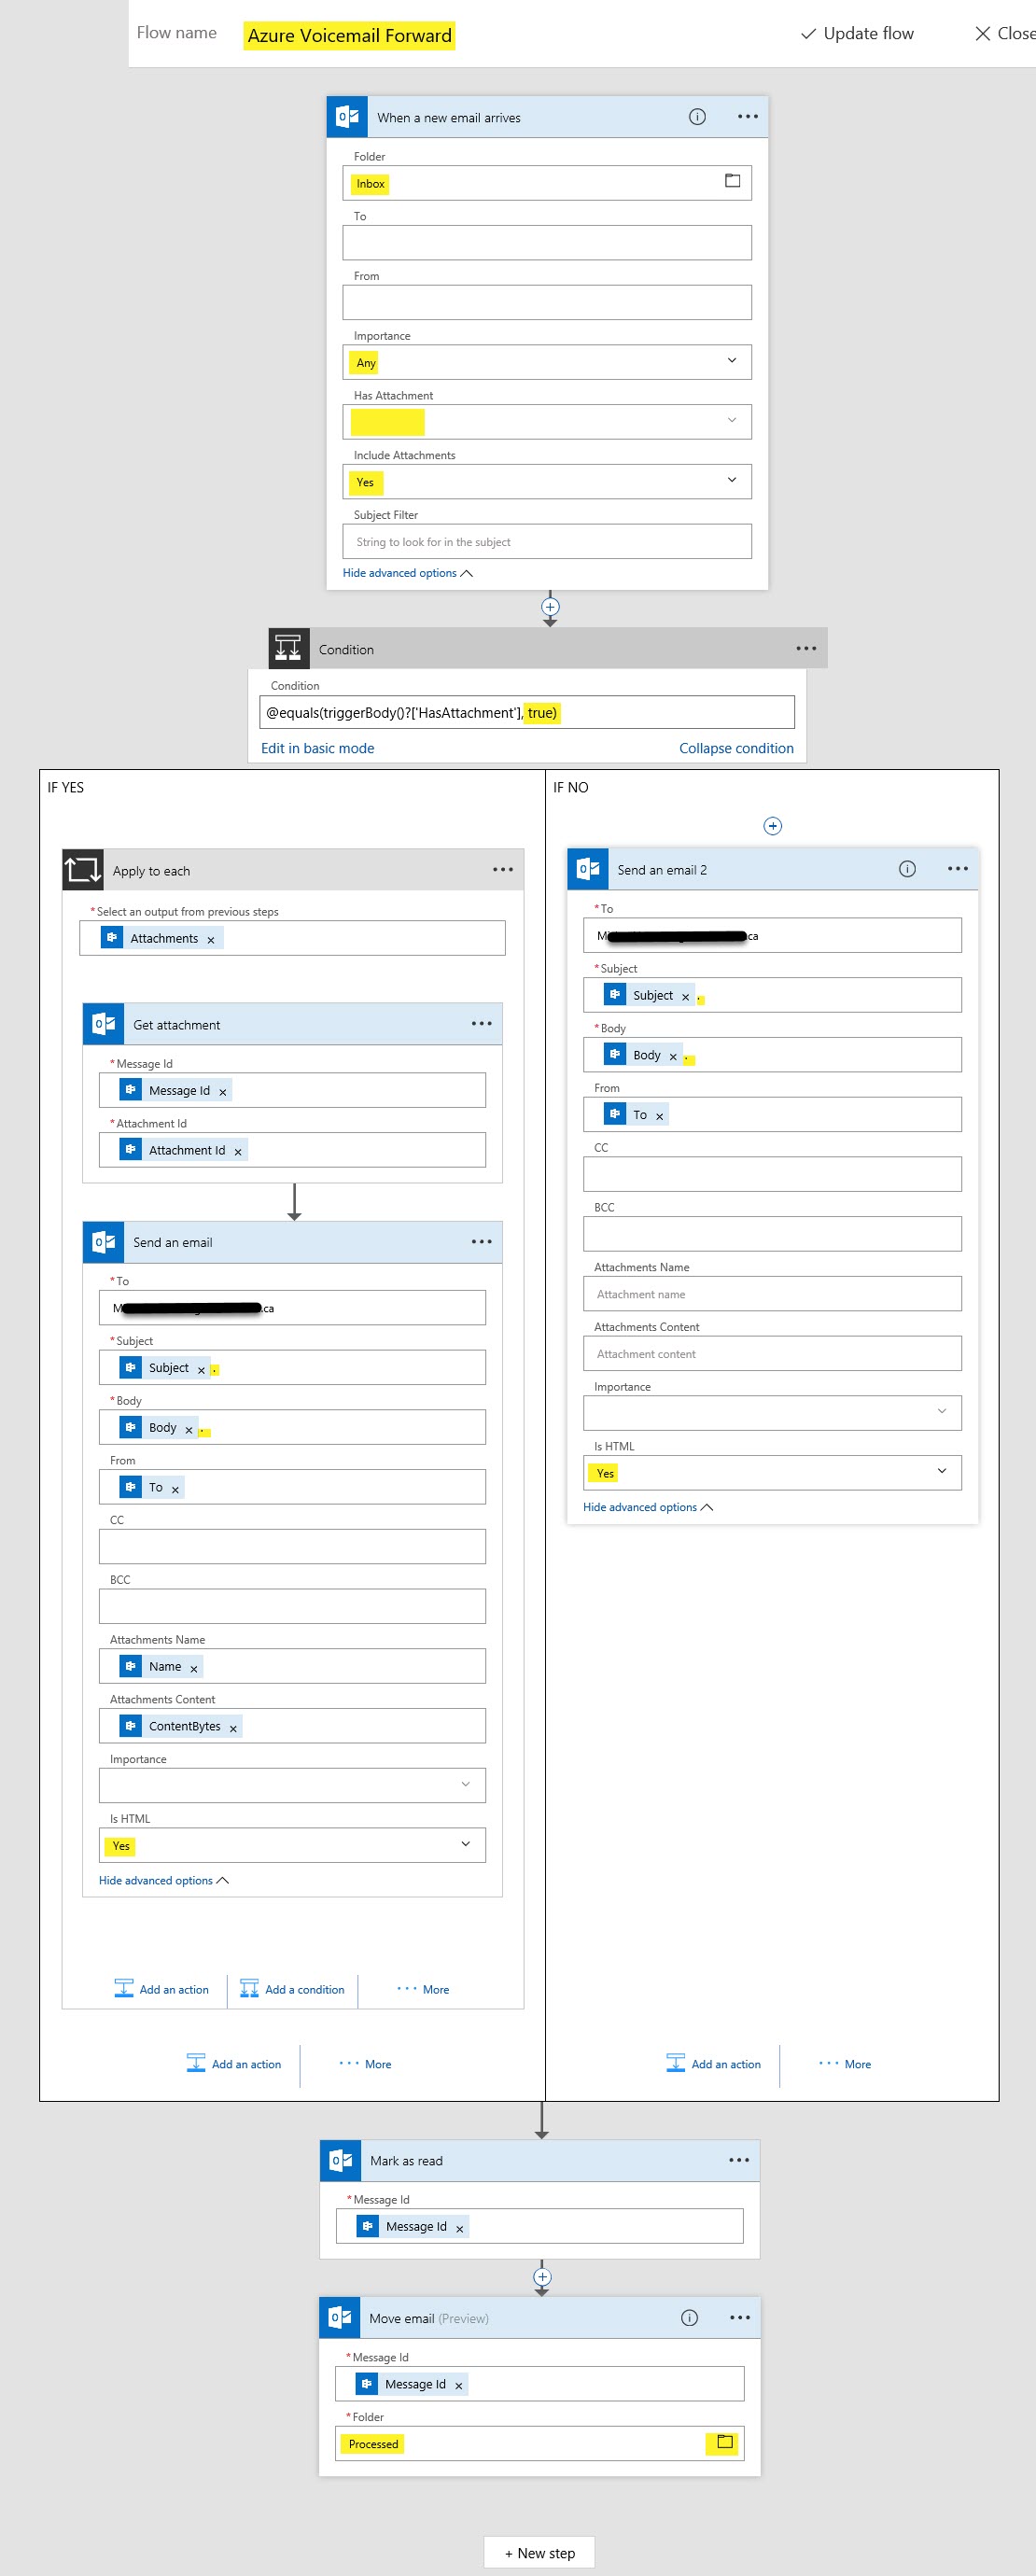
Workaround 4: Microsoft Flow (https://flow.microsoft.com/en-us/). I was pleasantly surprised to find that Flow was pretty much identical to the Logic App I built.

Flow is included in the following Office 365 plans:

  • Office 365 Business Essentials
  • Office 365 Business Premium
  • Office 365 Education
  • Office 365 Education Plus
  • Office 365 Enterprise E1
  • Office 365 Enterprise E3
  • Office 365 Enterprise E5

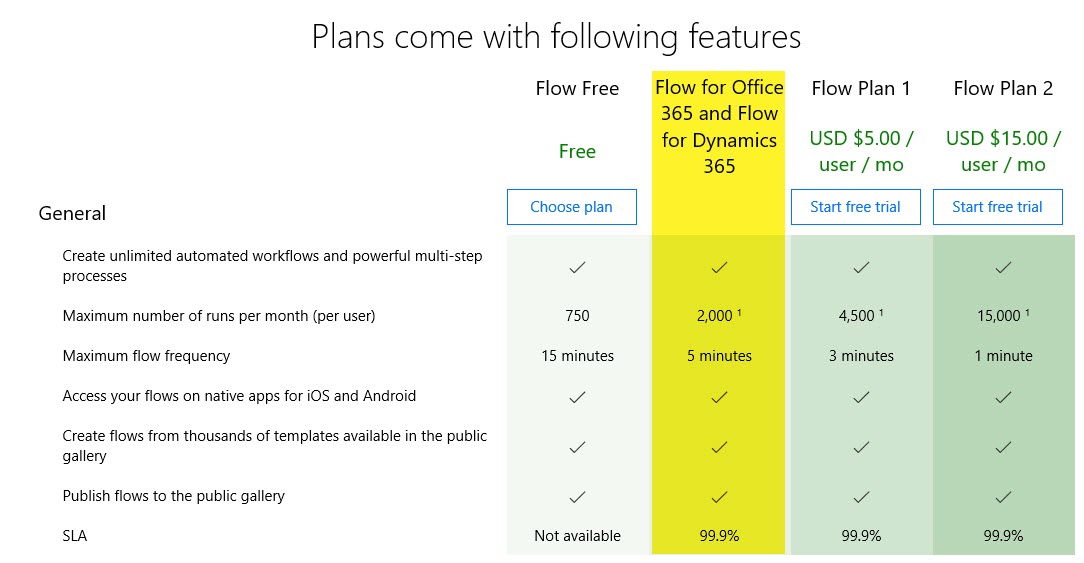
Flow Plan Features:

Basically the including version of Flow in Office 365 worked for my needs. If I needed to bump up the plan, it was still cheaper than Azure Logic App doing the same task.

Steps to build Flow to process Azure Voicemail:

  1. Click on the “Flow” tile in Office 365 portal while signed in with Team-Call Group account
  2. Click “My flows”
  3. Click “Create from blank”
  4. Flow name: “Azure Voicemail Forward”
  5. Services: “Office 365 Outlook”
    • Triggers: “Office 365 Outlook – When a new email arrives”
      • Click “…”, look at “My Connections”, should show mailbox where Azure Voicemail will deposit from CloudPBX
      • Folder: “Inbox”
      • Click “Show advanced options”
      • Importance: “Any”
      • Has Attachment: “blank”
      • Include Attachments: “Yes”
  6. Click “+ New Step”, Click “Add a condition”
    • Object Name: “Has Attachment”
    • Relationship: “is equal to”
    • Value: “true”
    • Click “Edit in advanced mode”, remove any quotes around true, Condition should look like: @equals(triggerBody()?[‘HasAttachment’], true)
  7. Under “IF YES, DO NOTHING”, Click “… More”, Click “Add an apply to each”
    • Select an output from previous steps: “Attachments” (Click “See more” if not shown in list)
    • Click “Add an action”, within same step
      • Services: “Office 365 Outlook”
        • Triggers: “Office 365 Outlook – Get-Attachment”
          • Message Id: “Message id” (Click “See more” if not shown in list)
          • Attachment Id: “Attachment Id” (Click “See more” if not shown in list)
    • Click “Add an action”, within same step
      • Services: “Office 365 Outlook”
        • Triggers: “Office 365 Outlook – Send an Email”
          • Click “Show advanced options”
          • To: Enter in Destination email addresses
          • Subject: “Subject”, also type some text like “.” (Flow will fail if Subject is blank)
          • Body: “Body” (use “Body” from “When a new email arrives” and not the one under “Get Attachment”), also type some text like “.” (Flow will fail if Body is blank)
          • From: “To”
          • Attachment Name: “Name”
          • Attachment Content: “Content” (I’ve seen “Content” switch to “ContentBytes”, both work)
          • Is HTML: “Yes”
  8. Click “+ New Step”, Click “Add an action”
    • Services: “Office 365 Outlook”
      • Triggers: “Office 365 Outlook – Mark as read”
        • Message ID: “Message ID” (Click “See more” if not shown in list)
  9. Click “+ New Step”, Click “Add an action”
    • Services: “Office 365 Outlook”
      • Triggers: “Office 365 Outlook – Move Email”
        • Message ID: “Message ID” (Click “See more” if not shown in list)
        • Folder: “Processed” (make sure to Create a matching folder in Team-Call Group’s mailbox)
  10. Click on “Condition” again, Under “IF NO, DO NOTHING”, Click “Add an action”
    • Services: “Office 365 Outlook”
      • Triggers: “Office 365 Outlook – Send an Email”
        • Click “Show advanced options”
        • To: Enter in Destination email addresses
        • Subject: “Subject”, also type some text like “.” (Flow will fail if Subject is blank)
        • Body: “Body” (use “Body” from “When a new email arrives” and not the one under “Get Attachment”), also type some text like “.” (Flow will fail if Body is blank)
        • From: “To”
        • Is HTML: “Yes”
  11. Click “Create Flow”
  12. Click “Done”
  13. Click “Manage”
  14. Click “I” button on new Flow (Monitor Flow Runs)
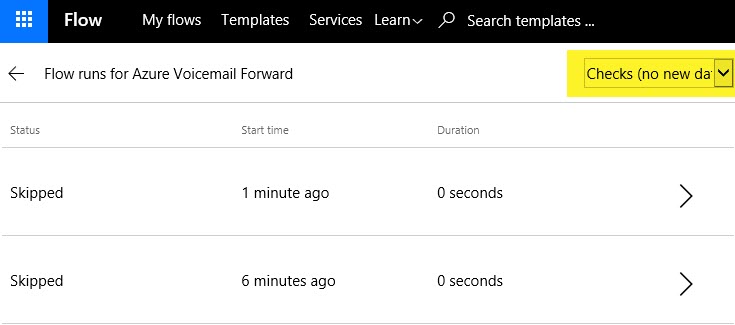
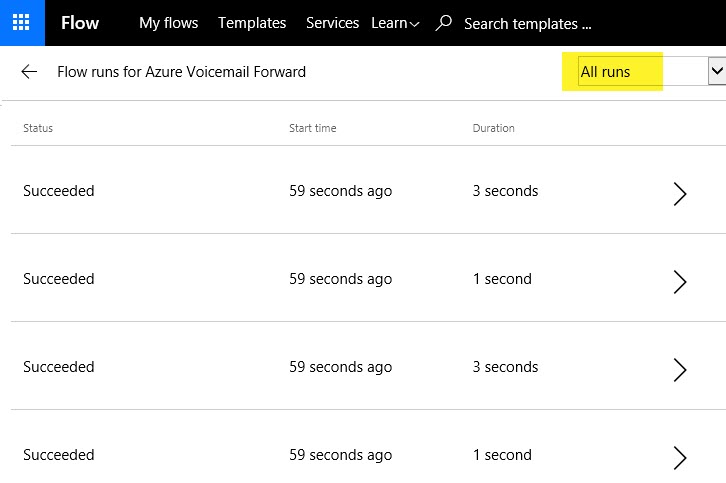
  15. Test: Wait until first run of Flow is complete, look under: “Checks (no new data)”, Leave Voicemail and Missed Call for Team-Call Group, look under: “All runs”


Client crash when selecting multiple voicemail messages in Skype for Business 2016

$
0
0

Just a quick blog post about a bug I ran into today with the Skype for Business 2016 client. While signed into a test account, I attempted to delete all the previous voicemail messages shown on the Phone/Dial Pad tab. Not really paying attention, I proceeded to click the first item, hold shift and select the last item. That was when all hell broke loose and the client became possessed and unresponsive. Task Manager to the rescue and able to reproduce time and time again, using on-premises or online accounts with Azure Voicemail or Exchange Unified Messaging.

Tested on:

  • 16.0.8105.1000
  • 16.0.7927.1017
  • 16.0.7830.1018

For your viewing pleasure:

Feel free to leave a comment with the client version if able to reproduce.

Skype for Business Cloud Connector Edition (CCE) – Operation was unsuccessful (504 Server time-out)

$
0
0

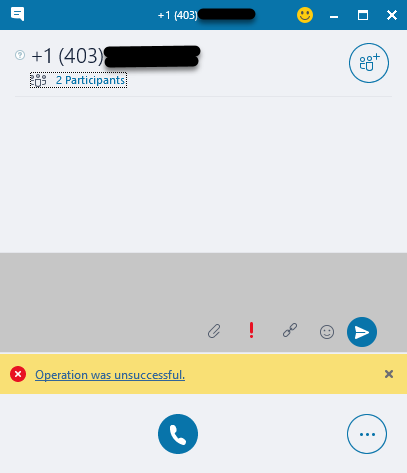
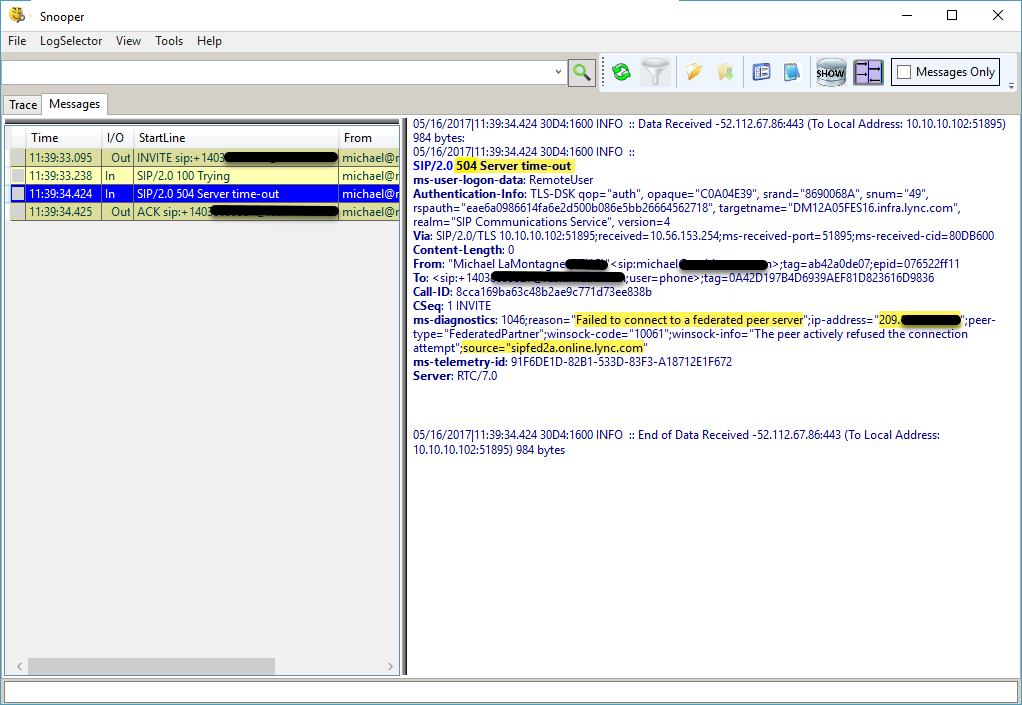
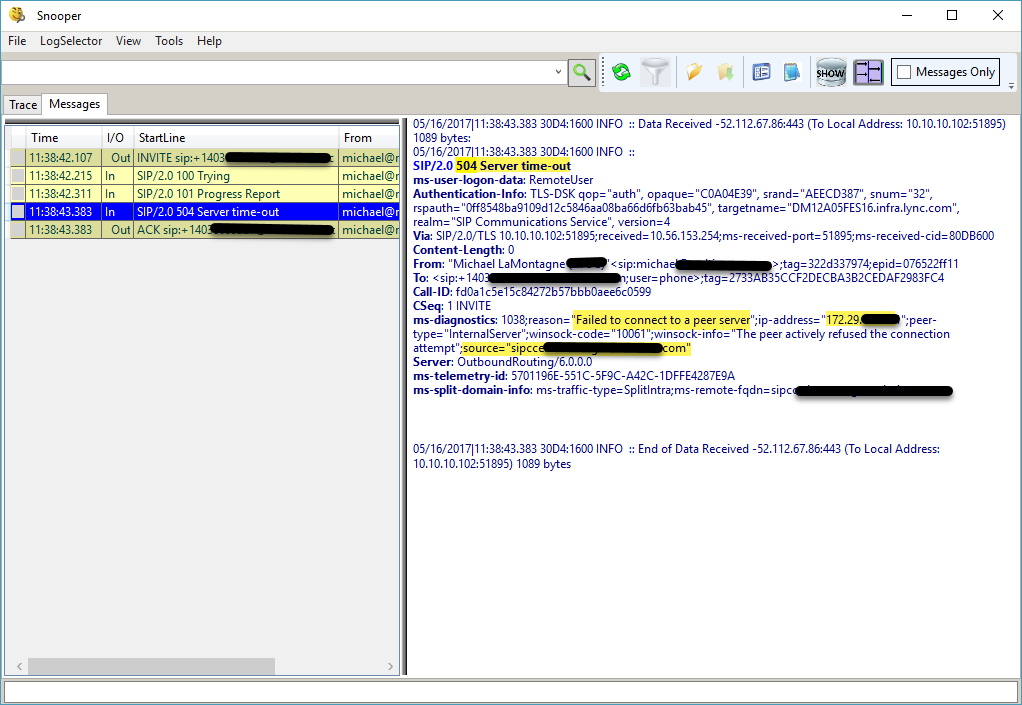
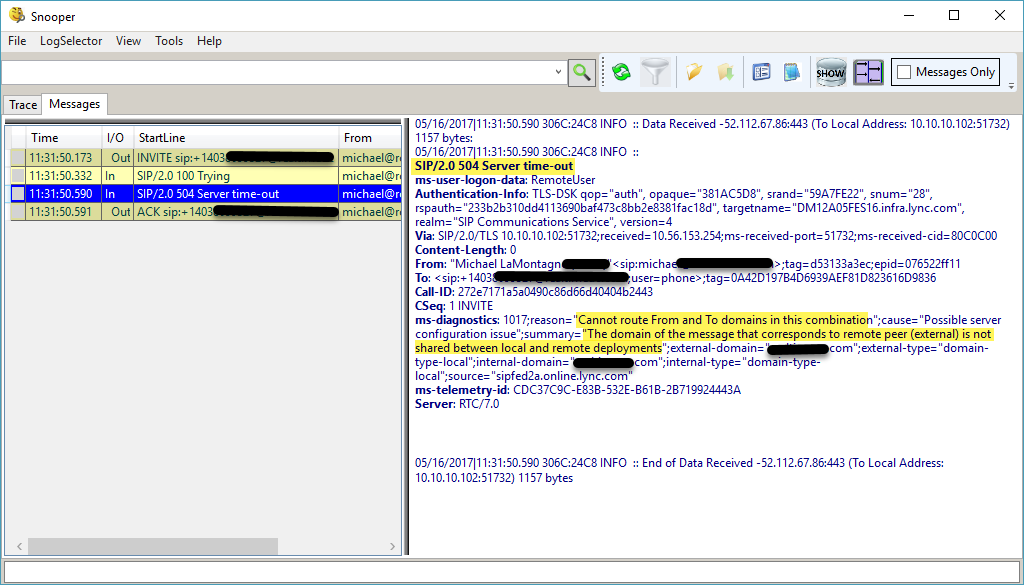
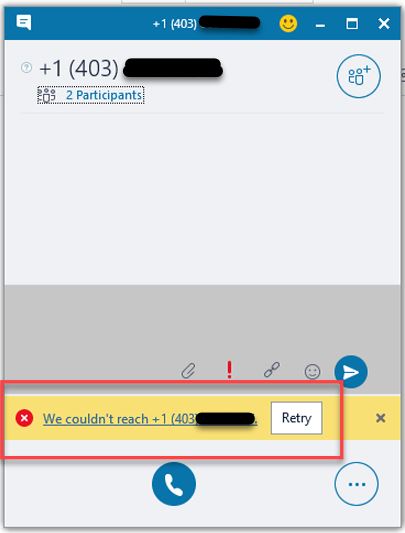
Today I’m shedding light on the SIP 504 response status code while working with Skype for Business Online’s CloudPBX and Cloud Connector Edition (CCE). The “504 Server time-out” error is masked in the Skype for Business Client as “Operation was unsuccessful” during an outbound PSTN call.

Understanding this error can actually become a handy tool in an Administrator’s toolkit (more on this later!).

The key is to view the ms-diagnostics details specific to the SIP response.

Let’s look at some scenarios that cause the 504 Server time-out response:

  • CCE Edge server outage:
    This will give you an ms-diagnostics message: “Failed to connect to a federated peer server”;ip-address=”X.X.X.X“;peer-type=”FederatedPartner”;winsock-code=”10061″;winsock-info=”The peer actively refused the connection attempt”;source=”sipfedXXX.online.lync.com”.

    The IP address will be the Public IP of the CCE Edge server and the source will be the last hop before the issue, this being SIPFed within Skype for Business Online.

  • CCE Mediation server outage:
    This will give you an ms-diagnostics message: “Failed to connect to a peer server”;ip-address=”X.X.X.X“;peer-type=”InternalServer”;winsock-code=”10061″;winsock-info=”The peer actively refused the connection attempt”;source=”cce.domain.com“.

    The IP address will be the Private IP of the CCE Mediation server and the source will be the last hop before the issue, this being the CCE Edge server.

  • Attempting to use an onmicrosoft.com domain or a SIP domain not configured within CCE:
    This will give you an ms-diagnostics message: =”Cannot route From and To domains in this combination”;cause=”Possible server configuration issue”;summary=”The domain of the message that corresponds to remote peer (external) is not shared between local and remote deployments”;external-domain=”domain.com“;external-type=”domain-type-local”;internal-domain=”domain.com“;internal-type=”domain-type-local”;source=”sipfedXXX.online.lync.com”.

    The domain referenced will be the CloudPBX user’s SIP domain that is not configured within CCE (onmicrosoft.com domains will never work) and the source will be the last hop before the issue, this being SIPFed within Skype for Business Online.

  • Sample of viewing ms-diagnostics message with Get-CSUserSessionGUI.

You might be asking yourself how could this 504 response be useful? Unfortunately, I figured this out a little too late a few weeks back.

I had opened a Microsoft Office 365 Support ticket due to an outbound calling issue. Even though I submitted the Client logs, made note the call never reached my CCE and selected CCE when creating the ticket, I was greeted with the canned response:

“We would be requiring the below mentioned logs to analyse the issue causing the problem.

  1. SIP Stack
  2. S4
  3. Mediation
  4. Inbound Routing
  5. Outbound Routing

Along with these logs we require the Client logs (Tracing Folder) as well as Cloud Connector Configuration ini File.”

I now know that if I simply just turn off my CCE and I don’t get a 504 response from the Client calling outbound, the call is not making it to SIPFed and is failing much earlier within Skype for Business Online.

Skype for Business Cloud Connector Edition (CCE) – We couldn’t reach +1XXXXXXXXXX (404 Not Found)

$
0
0

Today I’m shedding light on the SIP 404 response status code while working with Skype for Business Online’s CloudPBX and Cloud Connector Edition (CCE). The “404 Not Found” error is masked in the Skype for Business Client as “We couldn’t reach +1XXXXXXXXXX” during an outbound PSTN call.

Always view the ms-diagnostics details specific to the SIP response.

Let’s look at some scenarios that cause the 404 Not Found response:

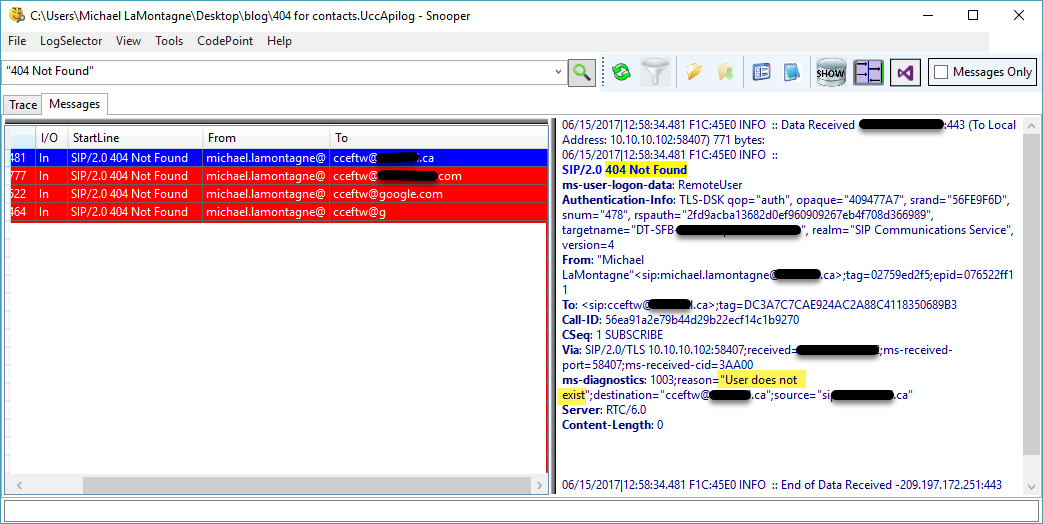
First, don’t be alarmed when you see many 404 Not found in the .UccApiLog. These are expected to occur when the Skype for Business client is attempting presence subscription or communication to contacts on external domains that don’t have federation configured or for objects that simply don’t exist in a domain.

  • User doesn’t exist in your domain:
    This will give you an ms-diagnostics message: “User does not exist”;destination=”user@domain.com“;source=”sip.domain.com
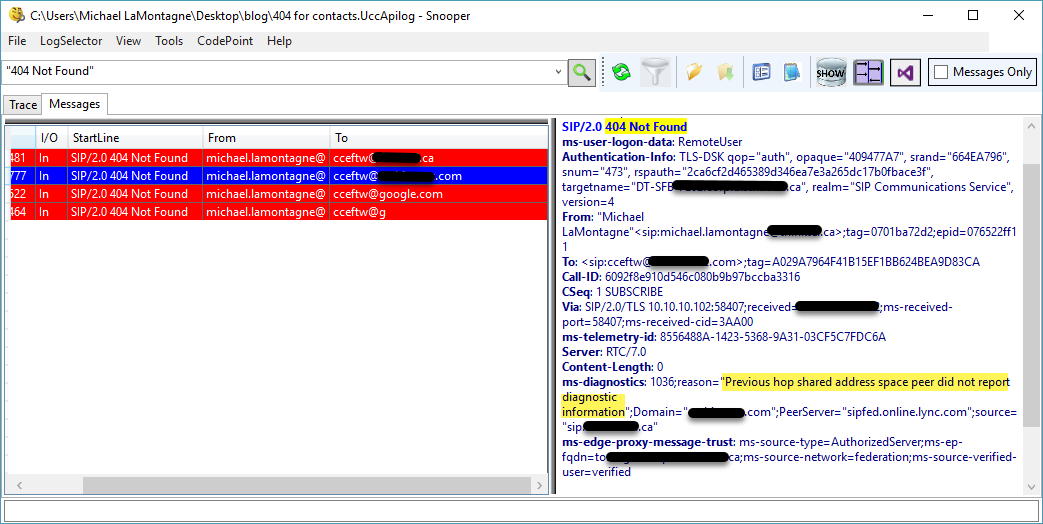
  • User doesn’t exist in a federated domain:
    This will give you an ms-diagnostics message: “Previous hop shared address space peer did not report diagnostic information”;Domain=”federateddomain.com“;PeerServer=”sip.federateddomain.com“;source=”sip.domain.com
  • User from an external domain and that domain is not configured for federation:
    This will give you an ms-diagnostics message: “Unable to resolve DNS SRV record”;domain=”externaldomain.com“;dns-srv-result=”NegativeResult”;dns-source=”WireQuery”;source=”sip.domain.com
  • Inbound PSTN called number that is either unassigned or doesn’t exactly match a User’s Line URI(E.164) in Skype for Business Online:
    This will give you an ms-diagnostics message: “Previous hop shared address space peer did not report diagnostic information”;Domain=”domain.com“;PeerServer=”sipfed.online.lync.com“;source=”sipcce.domain.com

The above is all expected, but what if everything is configured correctly and you experience a “404 Not Found” during an outbound PSTN Call when using CCE?

With a successful outbound PSTN Call to CCE, there will be a SIP “101 Trying” followed by a SIP “101 Progress Report”. The Progress Report will highlight communication between Skype for Business Online and the CCE, showing the call is being passed to “OutboundRouting” indicated by the “Trying next hop” message. From this point on, we know the Call is at the CCE and any SIP Errors would be between the CCE and your PSTN connectivity.

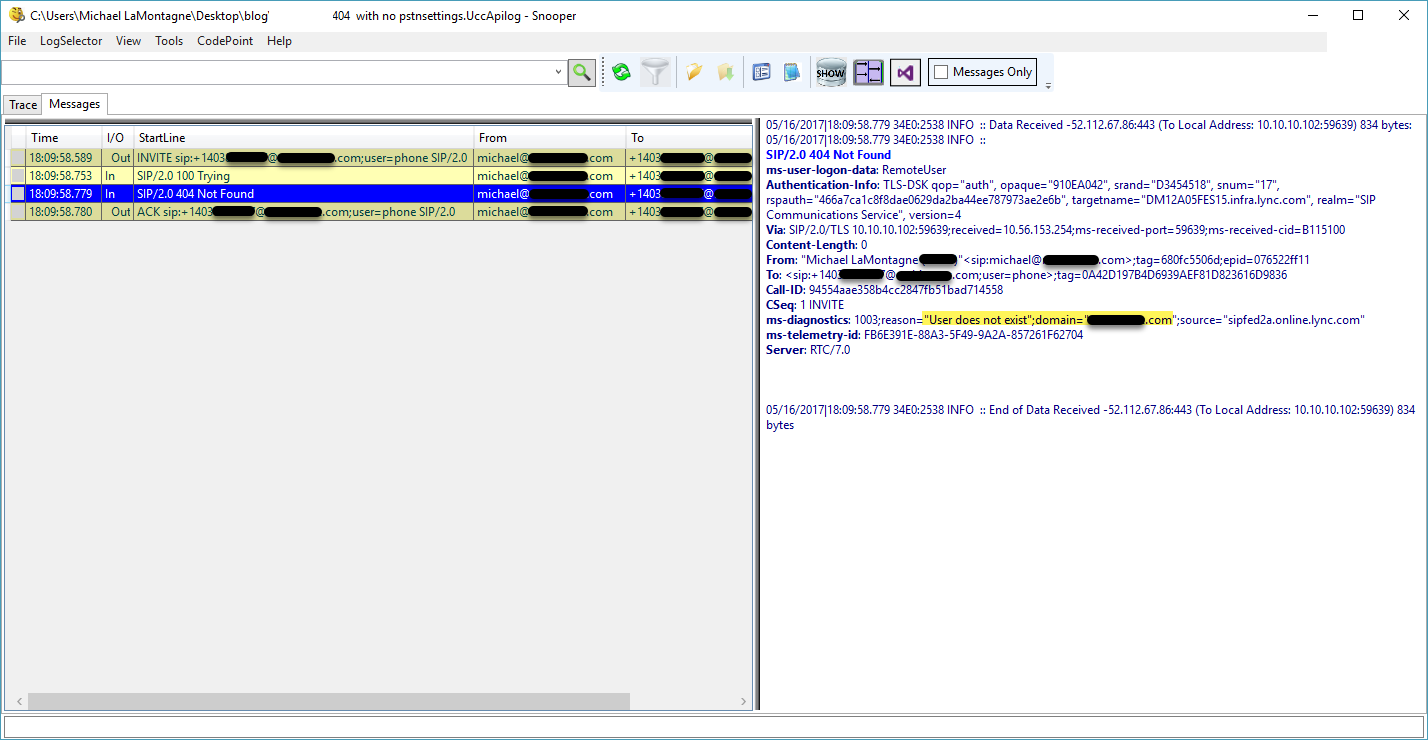
With the “404 Not Found” the call flow is quite a bit different. There is the same SIP “101 Trying”, but this is immediately followed by the SIP “404 Not Found”. What we find is Skype for Business Online is doing a Reverse Number Lookup (RNL) for the dialed number within your domain, of course this doesn’t match as we’re trying to call the PSTN and the call is terminated. The call never attempts Outbound Routing and is not sent to the CCE. That last statement is very important, don’t burn support cycles on the wrong rabbit hole. Most CCE issues would be indicated by a SIP “504 Server time-out”: http://realtimeuc.com/2017/05/sfb-cce-504/.

  • Digging into the ms-diagnostics message: “User does not exist”;domain=”domain.com“;source=”sipfed.online.lync.com

Possible fixes:

  • Confirm the specific Skype for Business Online user has the HybridPSTNSite configured pointing to CCE, using the Get/Set-CsUserPstnSettings: https://technet.microsoft.com/en-us/library/mt670902.aspx. Original CCE documentation just had you set the CCE at the tenant level using: Set-CsTenantHybridConfiguration -PeerDestination. I believe this parameter is going to be deprecated and the better experience is setting the CCE at the user level. Back in November 2016, a couple customers with working users experienced the CSUserPstnSettings was cleared for all their users.
  • User is classified as Hybrid, CCE does not support hybrid users. I use the following command to list hybrid users on a tenant:
    Get-CsOnlineUser | ? {$_.interpretedusertype -like 'hybrid*'} | select displayname,userprincipalname,interpretedusertype
    
  • Newly licensed for Cloud PBX, it can take up to 24 hours for a user to be enabled fully: https://support.office.com/en-us/article/Assign-Skype-for-Business-licenses-fd41934d-f2eb-4a1b-89d8-32cb37702b33?ui=en-US&rs=en-US&ad=US. I have seen new users have Inbound calling from CCE works within minutes but Outbound calling takes hours to a full day after the Cloud PBX license was applied.
  • Internal issues in Skype for Business Online, everything looks correct, but some internal replication or communication problem within Skype for Business Online is preventing the settings from being used. Best course of action is to check the Service Health dashboard for known issues and to create an Office 365 Support ticket.

Set-CsMeetingRoom unable to set Line URI when leveraging CCE for PSTN

$
0
0

Over the last year a handful of clients have requested assistance around configuring the Line URI for Meeting Rooms in Skype for Business Online when using Cloud Connector Edition (CCE) and Microsoft Phone System. Running the Set-CsMeetingRoom cmdlet with the -lineuri parameter, will greet you with a nice “Unable to set “LineURI”. This parameter is restricted with Remote Tenant PowerShell” error.

Unlike Set-CsUser, you will also notice the Set-CsMeetingRoom cmdlet does not have an OnPremLineURI parameter.

A report of this issue for Hybrid can be found on TechNet fourms: https://social.technet.microsoft.com/Forums/office/en-US/d1afa313-bb90-4157-8429-e2e1f6e2fefa/this-parameter-is-restricted-within-remote-tenant-powershell?forum=onlineservicesoc

So how does one enable a Line URI for a Meeting Room? Well, that depends if your sip domain identity is Federated/Synchronized or Cloud.

Update: An excellent tip from Damien Margaritis, who also was working on a similar issue recently; You can set the onpremlineuri via Set-CsUser prior to making the account a room account (Enable-CsMeetingRoom). Of course the accounts I was working with had already been configured as a room, the suggestion was to run Disable-CsMeetingRoom, configure the onpremlineuri and enable it again. I’m still holding out for the onpremlineuri to be added to Set-CsMeetingRoom.

Viewing all 14 articles
Browse latest View live